Baked Spinach, Feta, and Sundried Tomato Quinoa Cakes with Roasted Pepper Sauce

Sometimes it’s hard having a different opinion than the rest of the group. This is especially true in the food world. For example, try telling a chocoholic you don’t like chocolate and they will start to question your character.  What do you mean you don’t like chocolate? What kind of person are you??

Usually food preference is pretty subjective but some foods are so widely loved that expressing dislike towards them causes anger. I have somehow provoked outrage when I told people I didn’t like jello, or doughnuts, or scones, or even coffee. Sometimes I really want to like something because everyone else does, but my stubborn taste buds just won’t do it. Such was the case with quinoa.

It was initially just a food trend, but over the past few years quinoa has slowly become a food staple, and for a few years I have been trying to make it palatable. After every unsuccessful quinoa dish, I plan to never eat it again, but then I am bombarded with people raving about its’ great health benefits, and I find myself trying to cook it again.

This time I vowed not to listen to anyone anymore. But some voices you cannot ignore, such as the voices of your close family and friends. Every time I post anything about quinoa on facebook, it always gets more likes, more comments and more recipe requests than any other dish. So I decided to try quinoa one more time. My solution was to make a dish with enough additional ingredients to mask the quinoa “look” and a dipping sauce to mask the quinoa flavor. This scenario worked well for me as I get a nutritious meal with minimal quinoa flavor and my quinoa-hungry Khana Mama fans get a recipe with their apparently favorite ingredient.

Now if only I can find a way to make my kids eat it…

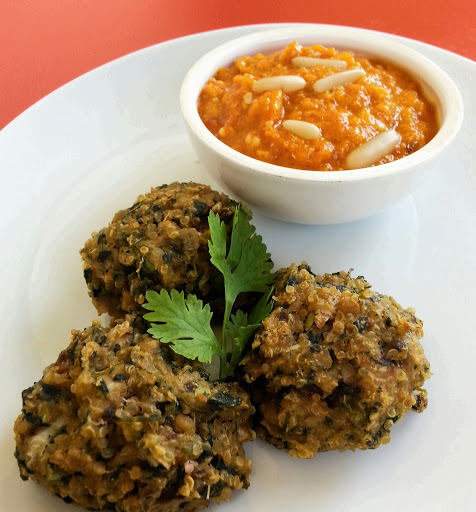
Baked Spinach, Feta, and Sundried Tomato Quinoa cakes with Roasted Red Pepper Sauce


Ingredients for Quinoa Cakes:
1 large egg
2 Tablespoons flour
2 Tablespoons tahini
1 1/2 teaspoons apple cider vinegar
2 cups cooked quinoa, cooked as per package instructions
1 cup cooked chickpeas (canned, rinsed chickpeas ok)
5 oz fresh baby spinach, sautéed and chopped with excess water squeezed out OR 1 cup frozen chopped spinach thawed with excess water squeezed out
1/4 cup chopped sun-dried tomatoes
¼ cup feta cheese
1 small finely chopped onion
4 Tablespoons chopped cilantro
3 cloves garlic, minced
1/4 teaspoon salt, to taste
1-2 tsp cumin to taste
Cayenne to taste

PREPARATION for Quinoa Cakes:
1. Preheat oven to 200C. Spray nonstick spray on cooking sheet.
2. If using fresh spinach, bring a large pot of water to a boil. Add spinach and cook until wilted. Drain in colandar and squeeze out excess water. When drained completely, chop.
OR
Defrost frozen chopped spinach and squeeze water out with paper towel.
3. Coarsely mash chickpeas in food processor. Add in sundried tomatoes, spinach, feta, garlic, onions, and coriander and mix in food processor until combined.
4. Combine egg, flour, tahini and vinegar in a bowl. Stir in COOKED quinoa and spices. Stir in remaining ingredients from food processor then mix (or mash) together until mixture is firm enough to shape in little patties.
5. Shape mixture into 1/4 cup patties and put on cookie sheet. Patties should not be too flat, and they will bake to the shape you leave them in.
6. Bake at 200C for 15 minutes then flip patties and bake another 10- 15 minutes or until brown and lightly crisp.
Serve with red pepper sauce.

INGREDIENTS For Roasted Pepper Sauce:

3-4 peeled roasted bell peppers NOTE: I like to use a combo of red, orange and yellow. (Peppers from a jar ok or you can roast them yourself: Just put them on baking sheet for 30-40 mins at 225C, remove from oven and cover with foil until cooled, then peel and throw away seeds)
1/4 cup toasted pine nuts
1-2 cloves garlic, grated
2 teaspoon apple cider vinegar
Salt, to taste
Cayenne, if desired

PREPARATION For Roasted Red Pepper Sauce:
1. Puree all ingredients listed for sauce in a food processor.
If you have extra sauce, it is great on burgers, quesadillas, crackers, or really anything!
Advertisement

Arabic Lentil Soup and Baked Pita Chips

After reading my last post, everyone kept asking me about the magical Arabic lentil soup that was  nutritious, great tasting, easy to make, and kid approved. In addition to making the soup, I have found myself cooking several Arabic dishes lately, because so many of them have these wonderful qualities. Sometimes I go through phases of cooking one type of cuisine. Currently I am in my Arabic phase. I’m finding Arabic food is the perfect blend of the spices of the east and the flavors of the west.

My first cooking phase was Indian food. As much as I loved the amazing spicy flavors and healthy veggies I was cooking, I was annoyed at all the steps and subsequent work that went in to making just one dish. All the chopping and mincing was even more difficult with two toddlers running around. I tried some shortcuts such as freezing 1 tablespoon portions of garlic and ginger pastes in an ice tray, so I could just pop them into the dish I was making, or plan my meals ahead so I could soak, chop, and marinate in advance.  But for a tired  unorganized spontaneous mother of two boys, advance planning did not always happen. So I figured it was time to switch cuisines.

I then moved on to western food which was easier to prepare, but often lacked the bold flavors my palette was accustomed to. I generally like things on the spicier side, and often in western cuisine there just wasn’t enough…spice. Sometimes the only seasoning would be salt and pepper and maybe lemon zest. So I found myself constantly altering recipes by either tripling the garlic, grating in more ginger, or adding cayenne or cumin or even Sri Racha.

Then I discovered cooking Arabic food. Although I had been eating it for years, I never made any Arabic dishes at home. I soon found out it is often easy to prepare, easy to clean up as many dishes can be cooked in one pot, quite healthy, and very tasty as it has enough spices to add a lot of flavor but not a lot of heat to overwhelm the ingredients.

So here is my variation of Arabic lentil soup. I like it heavy on the garlic and spices and veggies, but you can personalize it to your own taste. My kids especially like eating the soup with a dollup of yogurt and sprinkle of zaatar on top, as well as baked pita bread (recipe also below) to dip inside. Feel free to make your own version and let me know how yours turns out!

Arabic Lentil Soup and Baked Pita Chips


INGREDIENTS:
1 large onion, chopped
1 tablespoon garlic, minced
2 large carrots, peeled and chopped
1 green bell pepper, deseeded and chopped
Salt, to taste
1-3 teaspoon Arabic Spices, to taste.  (You can find these in the spices section of the supermarket labeled “Arabic Spices”or “Arabic Masala”. Or check at your local Middle Eastern grocer.)
1 Maggi Chicken or Vegetable stock cube  (You can leave this out but it really tastes better if you add it in!)
2 teaspoons Olive oil
1 cup masoor daal, soaked.  (Soak if possible, but not necessary. It does shorten the cooking time. See picture below for type of masoor daal to use.)

Masoor Daal

SOUP PREPARATION:
1. In a large pot fry onion in olive oil until softened and lightly browned. Add garlic and fry for a couple minutes. Add in carrot, bell pepper, daal, salt, and Arabic spices and saute for a few minutes.
2. Add in about 8 cups of water and bring to boil. Keep cooking until daal is cooked and vegetables are softened. Add more water as needed. Add in Maggi stock cube and make sure is dissolved.
3. After all is cooked, blend with stick blender until smooth. Check salt.

Serves 3-4 people. Serve with Baked Pita Chips (Recipe below) or bread sticks or sliced crusty baguette.
Baked Pita Chips

INGREDIENTS:
5 slices Arabic bread
1 teaspoon Oregano
½ teaspoon garlic powder
Salt, to taste
Olive oil

PREPARATION:
1. Cut bread into slices and arrange on baking sheet.
2. Brush with olive oil.
3. Sprinkle with oregano, garlic powder, and salt.
4. Bake in oven at 190C for 5 minutes or until crispy. Watch the oven as the pita crisps  and browns pretty quickly.

Vegetable Fried Rice

I could write a novel about the many times my kids have refused to eat what I have cooked. At first I thought their resistance was because the food I was making wasn’t appetizing. (Broccolini and quinoa salad, anyone?). But after careful observation, I have deduced the only reason they won’t eat my food is because they know I am the one making it and they just want to drive me crazy!

This realization became evident during dinner, which was chicken curry and fresh chapattis. Although my kids normally like this meal, this time they did not touch it. Luckily I had also made some vegetable fried rice (or “wice” as my young one calls it). Unfortunately, the wice was denied as well. I was starting to panic as hungry boys become crazy rowdy destructive boys in about 2 seconds, and I had no desire to clean or make anything else. At that moment my phone rang. It was my dear friend calling to say she had made lentil soup and was sending it over for dinner. I knew my kids hate soup but I was desperate.

As the soup arrived I quietly put it in their bowls and waited for their screams of protest. I kept waiting but all I could hear was the sound of soup being slurped down so fast I was afraid they weren’t breathing.
 
Then my older son finally spoke: “Mommy….?” he asked.

Hmmph. Finally a complaint, I thought. But he then said, “Mommy can I have this as my snack at school tomorrow?”

I think to myself:  Ok, let me get this straight. You don’t even like soup and now you want it at school too?? I am fuming.

Then he speaks again:  “Mommy can I have some more? This is soooo good!”

I am still in shock as I am refilling their bowls and giving them some more crusty bread to dip inside. Just then I hear my son singing an impromptu song: “Soup, soup, soup, soup…I love soup!”

My ego was bruised and I was pondering where I went wrong in my cooking. But instead of being upset I was happy they had eaten a nutritious meal and actually liked something. My thoughts were interrupted by my two year old who was trying to tell me something. He kept puckering his mouth in an ‘’o’’ position and I thought he was trying to give me a kiss. I was so touched at his sweetness. But then out came the sounds: “sh…shou…shouu…….shouuup!”

I promise I will post the recipe for my friend’s lentil soup soon, as it was delicious and clearly the dinner champion of the evening. But for now you must settle for the runner up, my vegetable fried rice.  It is all my fragile ego can handle.

Vegetable Fried Rice


INGREDIENTS:
Medium pot of cooked rice.  Day old, leftover rice is best.
1 large onion, chopped
1 tablespoon garlic,  finely chopped
1 bunch chopped scallions (both white and green parts)
1 large tomato, chopped and deseeded
Salt, pepper, and chili flakes to taste
1 tablespoon soy sauce
2-3 large eggs
1 small bunch chopped coriander,
Lime and cucumber slices for garnish

Note: Can also add any meat of your choice, tofu, or additional veggies such as broccoli or peas

PREPARATION:
1. Heat the oil on high. Add the onion. Stir well and when it’s softened lower heat slightly and add the garlic and sauté for a minute.
2. Add the rice and stir well. Add the tomatoes and mix. (If you are adding any other blanched or steamed veggies add them now)
3. Push the rice to the side of the pan and add a bit more oil. Crack the eggs into the oil and cook. Mix with rice.
4. Add the soy sauce and salt and pepper. Season to taste. Remove from heat.
5. Add most of the scallions and a little cilantro into the rice and mix.  Garnish with the rest of the scallions and coriander, lime, and cucumber slices.

Note: If you are adding meat, cube it and cook it first. Then add into rice at step 4. 

Chocolate Cupcakes and Chocolate Buttercream Frosting

Having two toddlers in the house is never easy, so when they both started school I was ecstatic that I would finally get a little time off in my day. But I soon realized that their being in school meant I would be assigned a lot of work as well. Every week they have some theme or other that the parents have to scramble around trying to find things for. For example, for Community Helper Day we had to find a fireman costume for my son…which he insisted be complete with hat and hose. Their class also just had Farmer Day to help illustrate their unit learning about living on a farm. (Sadly I found out last minute about Farmer Day and all we had lying around the house were some bandanas so my poor child ended up looking more like a gangster than a farmer).


But the theme days are nothing compared to what we must do for holidays. For Valentine’s Day we had to make handmade valentines for the whole class, make sure the kids wore something pink or red to school, and make some food for their class party. I decided to make cupcakes as I could easily double the recipe and greedily put aside some for myself. Actually I found myself making cupcakes for almost every holiday and class party. Cupcakes are great as they are the perfect size for little hands and versatile so you can decorate them to fit any occasion. Valentine’s Day? Just plop some heart stickers on top. Easter? Just add a chocolate bunny and some jelly bean ”eggs.”  St. Patrick’s Day? Make some green icing! I generally choose the easiest decoration since I am more of a spontaneous (ahem last minute) person, but now with Pinterest and other cooking and baking sites the possibilities are endless! 


Unfortunately  because there is such a plethora of information online and beyond, one can go crazy trying to find the perfect cupcake and buttercream recipe. For me, I prefer a moist cake and a rich but not too sweet buttercream. I always bake with my kids so I needed something easy to make and honestly something that doesn’t take too long to prepare as I prefer to spend my time eating rather than cooking :). 

After extensive googling I found a recipe that met all my needs. It is very easy to make, and uses ingredients that I always have at home, so if I get a last minute cupcake request as I often do, there is no need to go to the store.  One really interesting thing about this recipe is that it uses no eggs or butter and still turns out amazing moist cupcakes! Apparently the recipe is decades old and was from the Great Depression when eggs and butter were too expensive to buy. But today it makes a great option for vegans. I’m sure they must be tortured souls with no butter or eggs in their pastries…I know I would be. 


I have also included a buttercream recipe to frost the cupcakes. I love it because it uses almond extract which keeps the frosting from becoming too sickly sweet. If you don’t like almond extract, use vanilla instead. If you don’t want frosting, the cupcakes taste great on their own or sprinkled with a little powdered sugar too. 

So next time you have a party or somewhere you need to bring cupcakes, instead of going into panic mode or buying ones from the store, make these. It will be a fun activity to share with your kids and even more fun to eat together.  

Chocolate Cupcakes and 
Chocolate Buttercream Frosting


Cupcakes recipe by : Simply Recipes
 CUPCAKE INGREDIENTS:
1 1/2 cups all purpose flour
1/4 cup unsweetened cocoa powder
1 cup granulated sugar
1 teaspoon baking soda
1/2 teaspoon salt
1 cup brewed coffee (or 1 cup of warm water mixed with 1 1/2 teaspoons of espresso powder or instant coffee granules)
 *NOTE: If you don’t want to use regular coffee, either use decaf or leave it out completely and use plain water instead. But coffee really makes it taste better!
1 Tablespoon white vinegar
2 teaspoons vanilla extract
6 Tablespoon (1/4 cup plus 2 Tablespoon) olive oil
METHOD:
1. Preheat oven to 350°F with a rack in the middle position. Prepare a muffin tin with cupcake liners.
2 .In a large bowl, vigorously whisk or sift together the flour, cocoa powder, sugar, baking soda, and salt until there are no visible clumps (cocoa tends to clump up).
3. In a separate bowl, mix together the coffee (or water plus coffee granules), vinegar, vanilla extract, and olive oil.
4. Pour the wet ingredients into the dry ingredients and stir only until they just come together. The mixture should be thin and rather lumpy.
5. Ladle the batter into the cupcake liners, filling them about two-thirds of the way full. Place in oven and bake for 18 to 20 minutes, until a toothpick inserted in the center comes out clean.
6. Remove from oven and let cool in the pan for 5 minutes, then remove from pan and let cool on a rack. Once cool, you can eat plain, sprinkle with powdered sugar, or drizzle or coat with frosting.

Makes 12-14 standard sized cupcakes.
NOTE: If you want to make this a cake instead of cupcakes, double the recipe and use two 8-inch round cake pans and cook for 35-40 minutes.
Chocolate Buttercream Frosting 
Frosting recipe by: Savory Sweet Life
FROSTING INGREDIENTS:
1 cup unsalted butter (2 sticks or ½ pound), softened (but not melted!)
3½ cups confectioners (powdered) sugar
½ cup cocoa powder
½ teaspoon table salt
2 teaspoons vanilla extract or 1 teaspoon almond extract
4 tablespoons milk or heavy cream
METHOD:
1.Cream butter for a few minutes in a mixer with the paddle attachment on medium speed. Turn off the mixer.
2. Sift 3 cups powdered sugar and cocoa into the mixing bowl. Turn your mixer on the lowest speed (so the dry ingredients do not blow everywhere) until the sugar and cocoa are absorbed by the butter.
3.Increase mixer speed to medium and add vanilla or almond extract, salt, and milk/cream and beat for 3 minutes. If your frosting needs a more stiff consistency, add a little more sugar. If your frosting needs to be thinned out, add additional milk 1 tablespoon at a time.
Makes 3 cups.

Almond Tea Cake

I just celebrated my birthday in January. It was a month long affair, with dear friends and family showering me with gifts, well wishes, and of course tons of cake .  I really felt happy and blessed to have so many amazing people in my life and I would like to give something back. I have a cake recipe that is so simple to make, so tasty and very forgiving so it’s almost impossible to mess up.

This almond tea cake is delicious and beautiful and perfect for any occasion. I have used it for afternoon tea, baby showers, dinner parties,  and since it takes almost no time to prepare, have even made it on the spot for unexpected guests.

Enjoy! 

Almond Tea Cake

INGREDIENTS:

1 ½ cup Sugar
¾ cup Butter
1 ½ cup Flour
2 Eggs
Pinch of Salt
1 teaspoon Almond Extract
Slivered or Sliced Almonds for garnish

PREPARATION:

1. Melt butter and blend into sugar
2. Mix in eggs, one at a time.
3. Add flour, salt, almond extract and mix well.
4. Line 10” iron skillet with foil (Or just use a round cake tin)
5. Pour batter into pan and top with almonds for garnish
6. Bake at 350F for 25-30 minutes, or check center with toothpick for doneness.

Vegetable Pakoras with Coriander and Mint Chutney

I remember the day my foodie 3 year old became a food enemy.  Before that day, I smugly grinned while other mothers talked about resorting to feeding their kids plain boiled pasta for days.  I scoffed at Annabel Karmel’s cookbooks that talked about the need for special recipes to feed fussy toddlers. As my kids ate their edamame and chicken satay, I thought I missed out on the picky food phase and even had the nerve to think it was because my superior cooking skills.

But then it happened. I had made a huge meal of vegetable pakoras, chicken curry, and masoor daal. These were things my son had previously eaten and liked. But instead of eating my food, he chose to have raisins and string cheese for dinner. I thought maybe he wasn’t feeling well. The next day I made some chicken nuggets and french fries (both baked but still very yummy) and he didn’t even try them!! Eating habits like that can drive any cook to insanity.

I then thought about how I always ate everything I was given when I was a child. But then slowly, little details began popping up in my mind suggesting otherwise. One example was during a vacation in India with my family. We were on an extensive tour of Jaipur, Agra and Rajasthan and between sightseeing, had dined at many amazing restaurants which offered numerous varieties of delicious food. But no matter what the dish was, for some reason all I wanted to eat were pakoras and Pepsi. Day after day, I turned away many beautiful dishes to the wrath of all servers and family members and was branded an ungrateful wretch.

So much good food to experience but all I could eat were pakoras and Pepsi for 2 weeks! My parents must have been as annoyed with me as I am now when my kids don’t eat what they are supposed to. It’s interesting how life comes full circle.

Vegetable Pakoras with Coriander and Mint Chutney


Ingredients:
3 cups Chickpea Flour (Besan)* Usually found in the Indian section of grocery store
1-2 cups water
1 ½ teaspoon salt
1 ½ teaspoon red chili powder
1 large potato, peeled and sliced into matchsticks
1 bunch green onions, chopped
5 red Indian onions, peeled and cut in long slices
1 bunch coriander (cilantro), chopped
1 bunch spinach, chopped
Vegetable Oil for frying

Preparation:
1. Add first 4 ingredients to create pakora batter. Add additional water as necessary. Mix well in large bowl so batter becomes thick enough to coat the back of a spoon. If you are not sure with the consistency, thicker is better than runny. Let sit for 30 minutes.
2. Add all vegetables to batter until well mixed. (The vegetables should be LIGHTLY coated. The vegetables are the stars, not the batter. It may look like the batter is not enough, but as long as there is enough batter to coat all the veggies you will be fine. This light coating ensures crisp pakoras and not heavy soggy oily ones. )
3. Heat oil until hot. Fry pakoras by sprinkling by hand into hot oil. Do not drop a big blob of batter into the pan but instead sprinkle and spread evenly as a thin layer in the oil. Fry until golden brown.
4. Drain on paper towel. Serve warm with coriander and mint chutney.   

Lemon Muffin Recipe

I have learned that real life communication is often like that game “telephone” we used to play as kids. When you play “telephone”, one person says a phrase in the ear of the person next to him, and then that person whispers the same phrase to the next person until the very last person says the phrase out loud. It’s funny since the phrase said out loud has little resemblance to the original.

Every day I notice we all speak to each other yet the receiving end often gets a different meaning entirely, just like in the game. Just this morning, my son spent hours in class singing “Skip to my Lou” yet when he sang it back to me, said “Lou, Lou, skip to the moo”. Another example is listening to my friend from the UK who supposedly speaks perfect English, but with her accent and slang,  I have no idea what she is saying most of the time. So it was no surprise when I called to order 1kg of onions from the grocery store today, and they gave me 1 kg of lemons instead.

But rather than return them, I remembered the saying “When life gives you lemons, make lemonade.” So in the spirit of miscommunication, I changed the phrase from lemonade to lemon muffins, and luckily made a delicious misinterpretation.
Lemon Muffins

Original recipe from Cat Can Cook:

INGREDIENTS:
6 Tablespoons Butter
1 Cup White Sugar
2 Eggs
1 1/2 Cups White Flour
1/2 Cup Milk
Grated zest of 1 1/2 Lemons
1/4 teaspoon Salt
1 1/2 teaspoon Baking Powder

INGREDIENTS FOR TOPPING:
Juice of 1 1/2 Lemons
1/3 Cup White Sugar

PREPARATION:
1. Preheat oven to 400 farenheit. Grease muffin tins, set aside.
2. In a bowl, cream together butter, sugar and eggs. Add in flour, milk, lemon zest, salt and baking powder, mix well.
3. Spoon batter into the greased muffin tins, filling them 3/4 full.
4. Bake in preheated oven for 15-20 minutes.
5. Prepare topping. While muffins baking, combine the lemon juice from lemons and sugar in a bowl. Set aside. When muffins are baked, prick the tops with a fork, and drizzle topping over each muffin.
(**Do not skip this step, this glaze adds a yummy lemony punch to these muffins and makes them from good to amazing!)

Makes 12 muffins in standard muffin tin. 

Masoor for my Monsieur – Masoor Daal Recipe

A miracle happened today that brought me out of my blogging hiatus. My eternally picky husband who only likes his mother’s cooking complimented my masoor daal! His exact words: “Wow, this tastes just like back home, maybe even better.” I just stared at him in disbelief for a few seconds. After the initial shock wore off, I ran to the computer to instantly document this moment so it would be immortalized forever. My husband has always been my biggest food critic, particularly for desi food, so this was a huge personal achievement.

Indian food had always been a culinary obstacle for me. I guess I never learned how to make it since my mom was an amazing cook and it was always perfect and readily available.  Also I somehow wasn’t interested to learn about turmeric and cardamom with the same zest I wanted to learn about oregano and rosemary which seemed so much more exotic. So I ended up learning to make many international cuisines, but not my own Indian one. But then I met my biggest food critic who only enjoyed eating the one cuisine I couldn’t make!  He was not impressed with my existing culinary arsenal, and I resolved to one day win him over.

After many foodie battles and take-out dinners, I somehow ended up marrying my food adversary. Strangely enough, some well meaning Auntie gave me an Indian cookbook for a wedding present, and it was from that book that I tried making Indian food for the first time. I just followed the recipes blindly and they kept coming out flat. And my personal food critic was always there to point out the flaws.

Looking back, I now realize my weakness was my inability to understand the common Indian spices and how each spice enhanced or affected the taste of the dish. If I wanted to fix the flavor of my dish, whether I needed to add coriander powder, or cut down on the cumin were a mystery to me.  I also realized my ignorance was partly due to my lack of any previous guidance making any desi dishes. In many Indian kitchens (including my home), there is a round metal container, with smaller round containers inside for each individual spice. Whenever a meal is to be made, the matriarch of the family will take out this container and to the untrained eye, just haphazardly throw all the necessary spices into the dish, and before you know it, the dish is done and seasoned beautifully. No matter how many times you observe this phenomenon, you will never learn to cook Indian food this way! Trust me I have tried.

But then I practiced. After a lot of trial and error, I’ve learned quite a bit, and on my way to becoming the lady with my own round metal spice container. But the best measure of my success with Indian food is that my food critic finally gave a glowing review.

Masoor Daal


INGREDIENTS for Daal:
1 cup Masoor Daal , soaked in water for a couple hours.
*If you do not soak daal first, cooking time will be significantly longer, unless you use a pressure cooker to cook daal. My method is for stovetop only.
1 teaspoon turmeric
½ teaspoon red chili powder
½ teaspoon salt
1 tablespoon garlic, grated
1 teaspoon tamarind (imlee) paste – Can be found in most supermarkets or Indian grocers. I used Priya brand

INGREDIENTS For Tadka to add in daal:
1-2 tablespoon vegetable oil
1 onion, chopped
1 teaspoon cumin seeds
1 teaspoon ginger, grated
1-2 green chilis
1 cup cilantro, chopped

PREPARATION:
1. Add soaked daal and turmeric, chili, salt, and garlic in a pot with 5 cups water and bring to boil.
2. After boils, partly cover and lower heat and cook until soft.  Add additional water as necessary.
3. When done, mash or blend to desired consistency, (My hubby likes it quite blended) and add tamarind paste until fully incorporated. Set pot aside.
4. Heat oil in separate pan. Add onion and lightly brown. Add cumin seeds, ginger, green chilis and coriander.
5. Fry all together and add to hot daal. Mix.

Serves 2 generously. Serve with basmati rice.

Devilled Eggs

I don’t like eggs. Not runny, not scrambled, not fried, not sunny side up. Yet today was the second time in my life that I found myself faced with a multitude of hard boiled eggs. Last time, I had no idea what to do with them, but this time I was prepared.

My first egg dilemma was when we visited my husband’s village one winter in Punjab. We went to someone’s house for tea. I was pregnant and starving and sitting awkwardly in my salwar kameez. Our host started to pass out some food on a huge platter. When she came to serve me I was shocked to find about 50 perfectly arranged hard boiled eggs. I didn’t want to offend the host, but I definitely didn’t want to eat a plain boiled egg either. So, I just sat there petrified staring blankly. Luckily the chai came and the host moved on to the next person and I was saved from my bad egg etiquette.

Today is the day after Easter. I opened the refrigerator and found all the decorated boiled eggs waiting to be eaten.  I again stared blankly at them but this time no chai appeared to magically whisk them away. These eggs were here to stay unless I did something to them. I quickly scanned the ingredients I had and made some devilled eggs.  They were hella good. 😉

Devilled Eggs


INGREDIENTS:

6 hard boiled eggs, peeled
3-4 tablespoons mayonnaise
1 teaspoon Dijon mustard (or any you prefer)
Splash of worcestershire sauce
Sriracha hot sauce (or any you prefer)
Smoked paprika for garnish
Chives or green onion, chopped finely for garnish

PREPARATION:

1. Cut boiled and peeled eggs in half. Put all egg yolks in a bowl and mash with a fork.

2. Add the mayonnaise, mustard, worcestershire, sriracha and mix well. Adjust quantities to taste. Season with salt and pepper if desired.

3.  Put all egg yolk mixture in a piping bag and pipe back into the egg white halves. If you don’t have a piping bag, you can just cut a corner off of a Ziploc plastic bag, or just spoon the mixture back into the egg white halves.

4. Garnish with smoked paprika and chives.

The variations of devilled eggs are endless. I just used what I had in my refrigerator, but you can use anything. Be creative! Would love to hear about it!

Jalapeno Sweet Corn Muffins

I love jalapenos. Growing up in California, they were always around. Even as a kid I loved jalapeno poppers and jalapeno chips. During my second pregnancy, I had such a strong craving that I almost ate an entire jar of pickled jalapenos in one sitting.

I especially love how jalapenos add a little kick to many foods such as burgers, salads, or in this case sweet corn muffins. These muffins cannot be made at a bake sale and left out for hours waiting to be devoured. These muffins need to be eaten fresh out of the oven, sliced open while still steaming, and topped with a nice pat of butter. Or some fresh grated cheddar. Or both. Or eat just as is. Either way you will not be disappointed.

Jalapeno Sweet Corn Muffins


Makes about 18 muffins, Inspired by original recipe by Albers

INGREDIENTS:
1 ½ cups all-purpose flour
2⁄3  cup granulated sugar
½ cup yellow cornmeal
1 tablespoon baking powder
½ teaspoon salt
1 ¼ cups milk
2 large eggs , lightly beaten
1⁄3 cup vegetable oil
3 tablespoons butter, melted
½ cup pickled jalapeno, chopped fine (more or less to taste)

PREPARATION:
1. Preheat oven to 350°F Grease or paper-line 18 to 20 muffin cups, or a pan for cornbread.

2. Combine flour, sugar, corn meal, baking powder, and salt in medium bowl.

3. Combine milk, eggs, vegetable oil, and butter in small bowl; mix well.

4. Add liquid mixture to flour mixture; stir until just blended.

5. Pour into prepared muffin cups filling 2/3 full.

6. Sprinkle chopped jalapeno pieces on top of each muffin. Remember a little goes a long way if you are using really spicy jalapenos!

7. Bake for 18-20 minutes or until wooden pick inserted in center comes out clean. Cool in pans on wire racks for 5 minutes, remove to wire racks to cool slightly. Serve warm and enjoy!