Fruity Chia Seed Pudding

20140821_091601_1Growing up in America in the 1980’s, if you heard the name “chia” you would automatically associate it with Chia Pets, which were terracotta pots shaped like animals. The concept was to rub moistened chia seeds on the pot and after awhile, they would sprout and grow chia “fur” on the pet.

Remember this?

chiapet I never thought that decades later I would see chia seeds in my kitchen again. Thanks to their high nutritious content (being packed with fiber, protein, and omega 3 fatty acids among others), chia seeds’ popularity grew and are a household name once more. I especially love them in smoothies or my favorite: chia seed pudding.

So easy, delicious and nutritious…try it for breakfast today! Ch-ch-ch…Chia!

Fruity Chia Seed Pudding

20140822_090723_1Ingredients:

2 Tablespoons Chia Seeds

½ cup almond milk

1 teaspoon agave syrup (optional, to taste)

½ teaspoon vanilla extract

Toppings Ingredients:

Option 1: ½ cup blueberries and raspberries

Option 2: 1 small diced mango and 1 tablespoon pistachio nuts

Method:

  1. Add in bowl the night before eating: Chia seeds, almond milk, vanilla and agave if using. Mix well.
  2. In morning, mix chia pudding and top with any topping you like such as berries or nuts.

Notes: Makes 1 serving. Easy to double. Great make-ahead recipe for busy mornings.

Pantry Diva Logo1


Spinach, Feta and Onion Quiche

Image

When I first moved to Dubai, it was all about brunch. Friday brunch is an institution in Dubai, and since I was not yet a mother, Friday brunch had soon become my weekly tradition.  I had endless hours to eat, drink, and be merry. (I also had endless hours to recover the next day, as I used to do this thing called “sleep.” ) But now that I have two very rambunctious boys, I cannot just laze around for hours doing brunch. With my new time constraints, I have now moved on to breakfast or shall I say “brekkie.” It fits into my current lifestyle well as breakfast is so early in the day, an essential quality for my little early risers, as well as being a relatively quick meal so we can go out and do other things.

At first I was not accustomed to eating much at breakfast. In the past, I never had much appetite early in the morning (probably because I was still sleeping). But if I did happen to be awake, I would eat some cereal at the most. Soon, as my brekkie dates got more regular, I noticed I would always order the same thing: quiche. I loved how no matter what type of quiche I would order, it would always taste good…smoked salmon and chives, artichokes and onions and cheese, roasted red pepper and feta…the delicious combinations were endless.

The funny thing is that I always thought of quiche as something I could only buy at a restaurant, and not something I could make at home. Homemade crust? I thought that must surely take ages and won’t be easy to do with my little monkeys running around.  It was not until I went to my friend’s place for breakfast (who has 3 kids) and served me homemade quiche at 9:30am straight out of her oven that I realized quiche was a home made brekkie possibility. I did try one version here, but I have since simplified it and have an even easier, tastier and healthier version I make now. I am constantly trying to get my kids to eat more veggies, and they actually like this!

This recipe takes less than 30 minutes to prepare so it is definitely something you can throw together quickly (and clean up while it bakes), or even make ahead and rewarm later. I would love for you to try it and let me know how it turns out. I would also love to hear your favorite quiche recipe or flavor!

Pantry Diva Tip: Feel free to use up any veggies or cheese you have hanging out in your fridge, quiche is a great way to clean out that veggie drawer!

PS. Hubby eats this too…yes men do like quiche, they just don’t always admit it!

Spinach, Onion and Feta Quiche

Image

Crust Ingredients:

1 cup flour

1/2 teaspoon salt

¼ cup melted unsalted butter OR 1/4 cup olive oil  OR 1/4 cup canola oil

1/4 cup ice  water (I use refrigerated water)

Filling Ingredients:

1 red onion

2-3 cloves garlic

2 bunches fresh spinach, chopped, thick stems removed, or baby spinach (6-8 cups)

4 eggs

1  ½ cups lowfat milk OR ¾ cup whole milk and ¾ cup heavy cream if want a denser and creamier consistency (I use lowfat milk and it tastes great!)

Reduced fat low salt feta cheese, or any cheese you prefer

Extra virgin olive oil

Salt and freshly ground black pepper to taste

Crust Preparation:

1. Mix flour and salt with fork.

2. Beat oil (if using) and water with fork to thicken and pour into flour and salt. If using butter, just pour directly into flour with water.  Mix with fork until the dough holds together.

3.  Press dough into 9″ round pan OR roll out dough on silpat liner with rolling pin and press into 9” round pan. (I prefer the roll out method as it is faster and more uniform, although it does compromise on the flakiness of the crust. Either method is fine!)

Filling Preparation:

4. Chop onion and garlic in chopper.

5. Heat olive oil in pan and sauté onion and garlic for a couple of minutes, then add chopped spinach and sauté until it is wilted. Season with salt and pepper and let cool. Add spinach mixture into the prepared crust.

6. In separate bowl, beat eggs, milk ( and cream if using) with salt and pepper with mixer. Pour over the spinach mixture in crust.

7. Top with crumbled low fat reduced salt feta cheese, or any cheese of your choice.

8. Bake at 200C/400F until done, around 35-45 minutes. Let cool for 10-15 minutes before cutting.

My first post as Pantry Diva – Shakshuka: Poached Eggs in Tomato and Chickpea Sauce

Image

Hello Everyone! So this is my first post as Pantry Diva instead of Khana Mama. This change came about because when people would ask me, “So what is your blog about?”, I always found myself struggling to come up with a succinct answer that would summarize the idea of my blog. So during a brainstorm session with friends, the concept of Pantry Diva was born. I am rejoicing that I now have a tagline: “Making fabulous things from everyday ingredients found in your pantry.” Oh joy!

The main difference in Pantry Diva is that I now have a clear direction in writing. But the theme of simple, healthy recipes will remain the same. And by the way, all of the old Khana Mama posts have been transferred to Pantry Diva so nothing has been lost. I still have a bit of reformatting to do, but that will come in time. Please bear with me!

It is actually lucky that I already have my blog in place, because my first recipe required the finesse of a true Pantry Diva. Yesterday, the 46th floor in my building had a broken pipe, and water was spewing down the whole building. This flood had forced the temporary closure of all our elevators. I was home with hungry children and dinner time was quickly approaching. I live on the 21st floor so my options were:

A. Walk down to grocery store to buy items and then walk back up and cook.

Yea right.

B. Walk down with children to restaurants below.

Assuming we would even make it, this would cause them to be hungrier and crankier.

C. Order food and make the poor delivery guy walk up to our place.

Tempting…but again not the healthiest option and unsure about delivery time.

D. Look in the old pantry and see what I can whip up.

Walking is not something we do much here in Dubai, and no I will not send my maid down in this heat…so ‘option D’ was the winner.

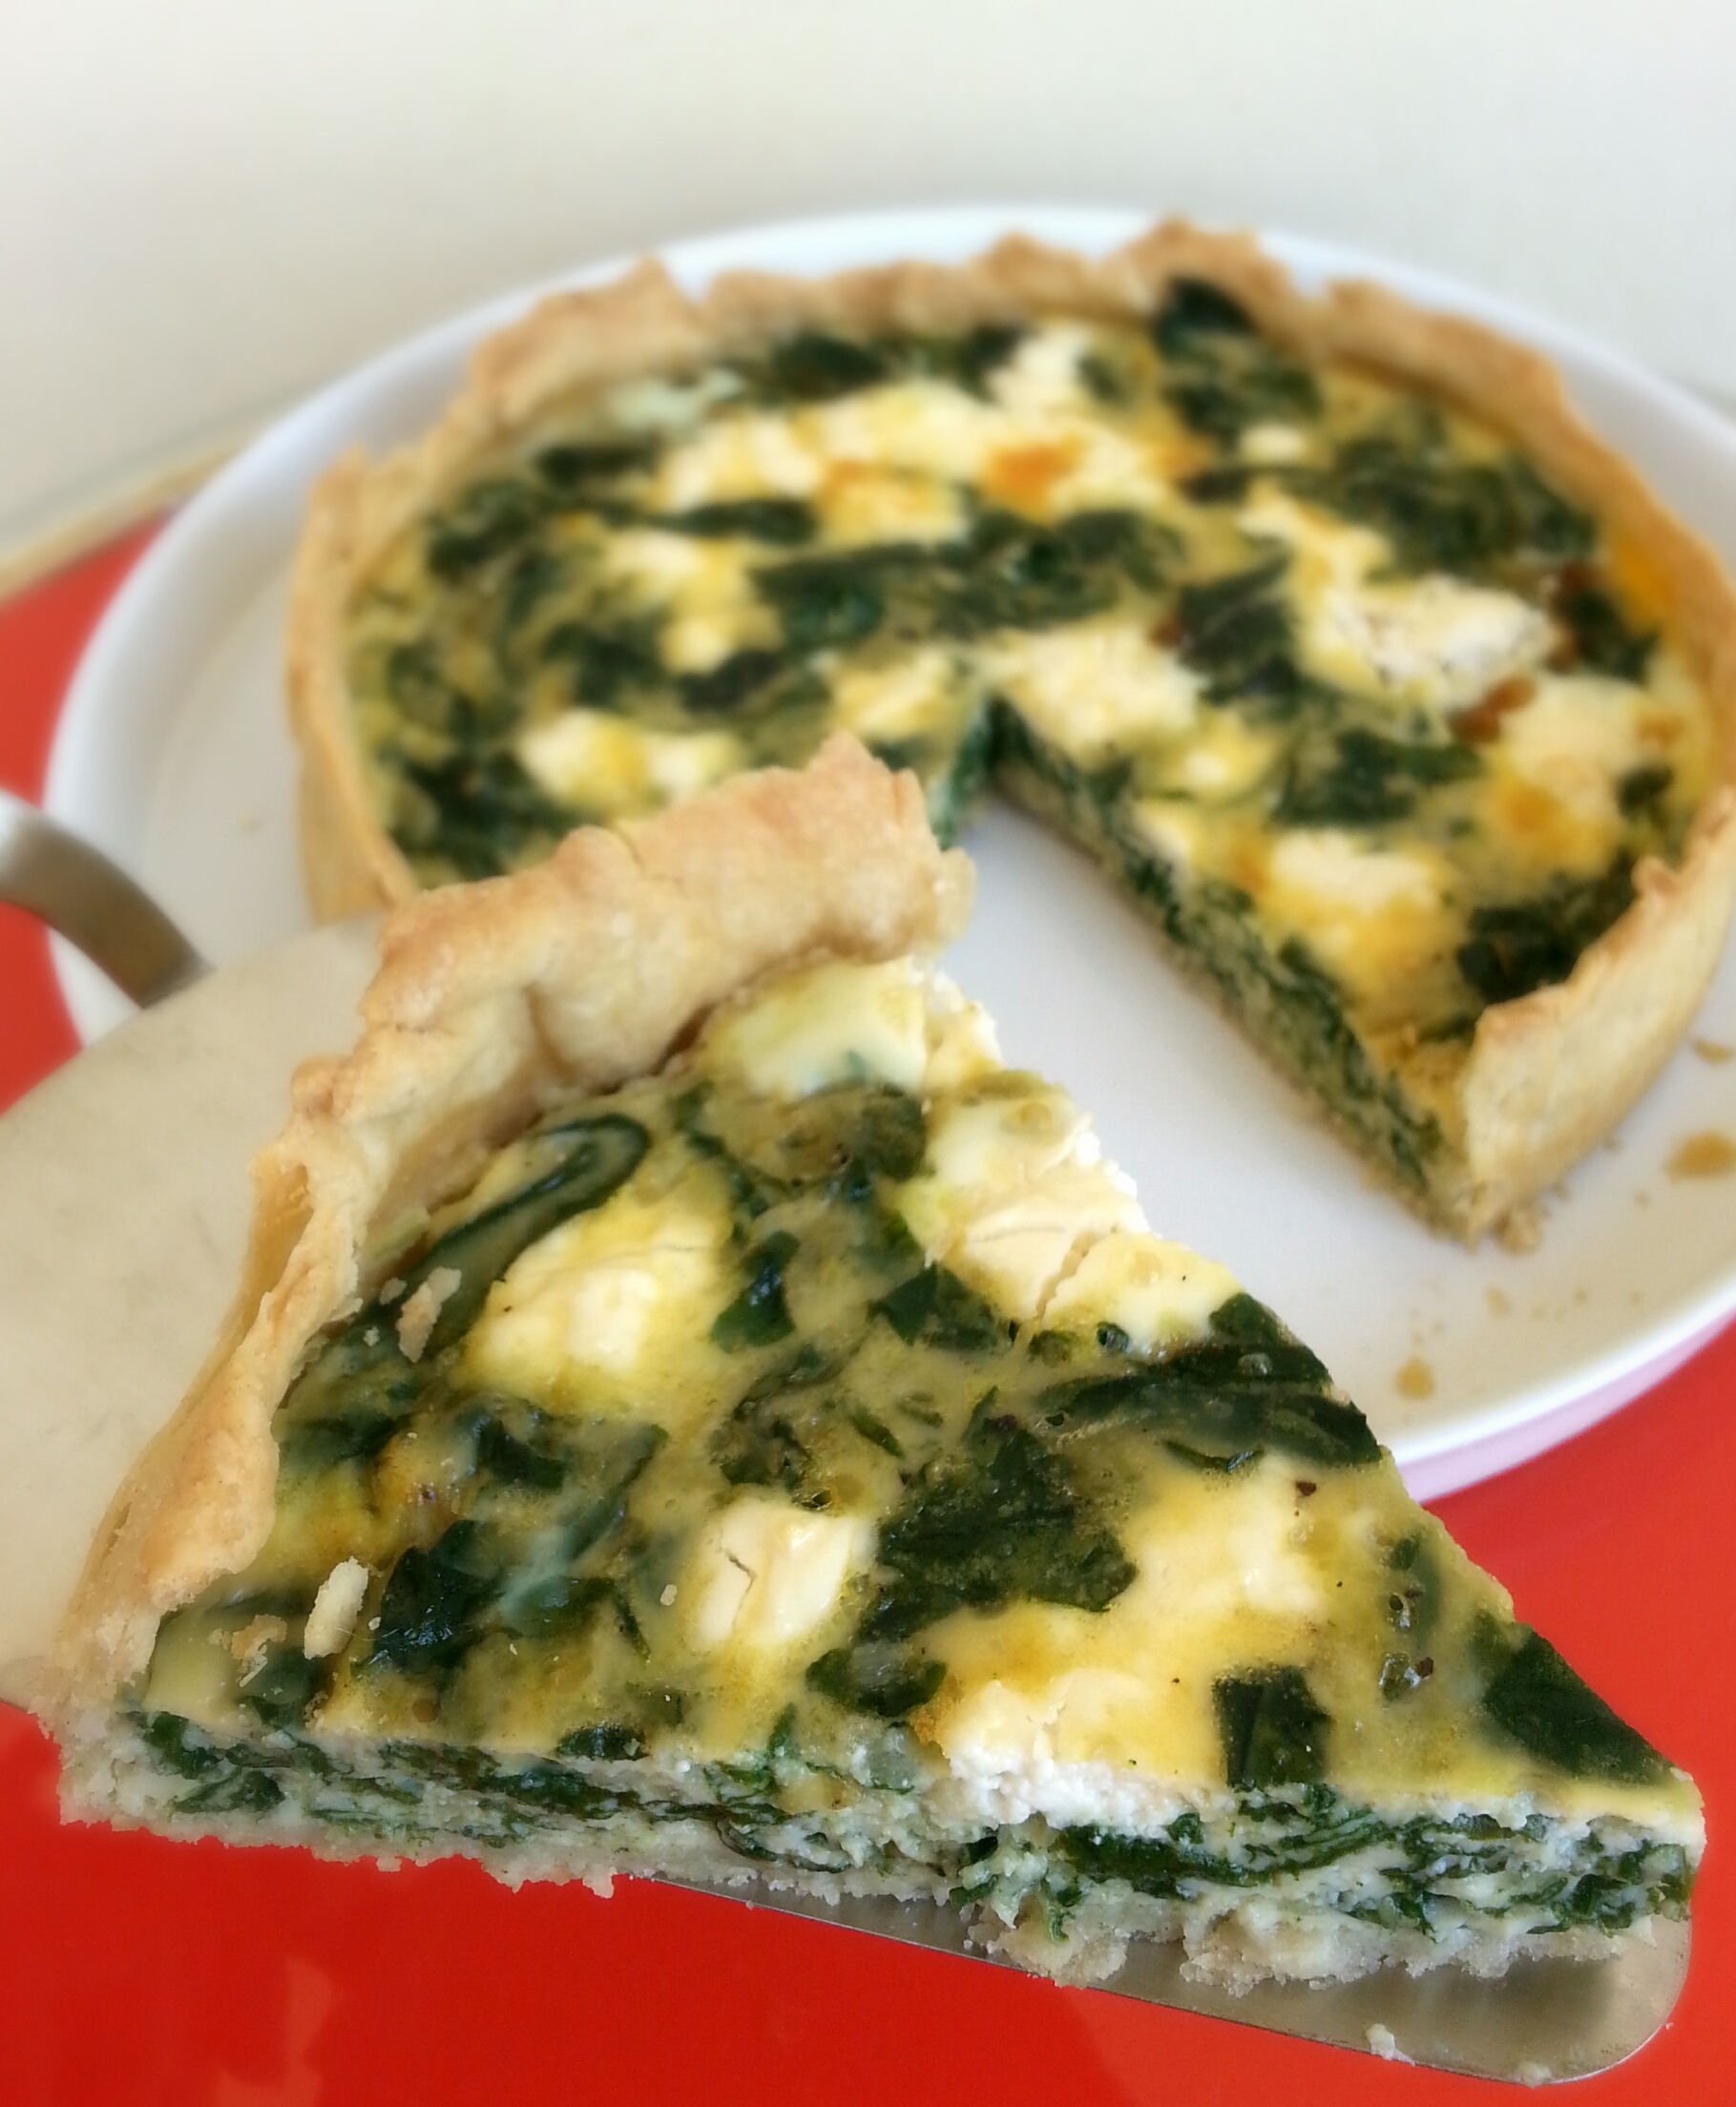
As I was looking through my well stocked pantry I remembered this past summer when I was visiting my family in California and needed to throw together a quick meal without a trip to the store…I made my version of Shakshuka and everyone loved it. It is traditionally a Middle Eastern breakfast dish of poached eggs in a tomato sauce, but you can enjoy it anytime. You can serve it with Arabic bread, pita, rice, or any bread you have lying around. I like to eat it plain too!

Image

 Shakshuka: Poached Eggs in Tomato and Chickpea Sauce

INGREDIENTS:

2-3 teaspoons olive oil

1 medium onion, finely chopped

5 garlic cloves, minced

2 jalapeños, seeded, finely chopped (optional- pickled jalapenos in a jar work too)

½ cup of roasted red peppers (optional – I just had these lying around so I added them in)

1 15-ounce can chickpeas, drained and rinsed

1 tablespoon paprika

1 teaspoon ground cumin

¼ teaspoon cayenne or red chili powder (optional or to taste)

2 14 oz. cans of chopped tomatoes

¼ cup toasted pine nuts (optional for garnish)

Salt and freshly ground black pepper to taste

1 cup coarsely crumbled feta (goat cheese or any cheese you prefer)

6-8 large eggs

Small bunch chopped fresh coriander (Or any herb you like – you can keep extra fresh herbs frozen in olive oil or just chopped and frozen in ice cube trays so you have some on hand all the time)

Warm pita bread (or rice or any bread you like)

PREPARATION:

1. Preheat oven to 425°F (220C). Heat oil in a large ovenproof skillet over medium-high heat. Add onion, garlic, and jalapeños; cook, stirring occasionally, until onion is soft, about 6-8 minutes. Add paprika, cumin, and cayenne and chickpeas and cook for 1-2 minutes longer.

2. Add canned tomatoes and their juices. Add red peppers if using. Bring to a boil, reduce heat to medium-low, and simmer, stirring occasionally, until sauce thickens slightly, about 15 minutes. Season to taste with salt and pepper.

3. Sprinkle feta evenly over sauce.

4. Crack eggs one at a time and place over sauce, spacing evenly apart. Transfer skillet to oven and bake until whites are just set but yolks are still runny, 5–8 minutes. (I kept mine in for 8 minutes and they were pretty much cooked through. Also it’s better if you keep the eggs on the surface instead of making little wells and letting eggs touch the bottom of the pan otherwise they overcook immediately).

5. Garnish with cilantro and pine nuts. Serve with pita for dipping.

By the way, if you hate eggs, just leave them out! It is delicious without them too.

Shakshuka  recipe inspired from Epicurious.

Fluffy Pancakes

I was invited to my friend’s place for dinner the other day. She doesn’t have kids. She had made enchiladas and I was looking forward to having a leisurely meal without having to worry about flying cutlery or airborne cheese. But I soon realized that certain meal time behaviors had been ingrained in me even though my little ones weren’t there.
I was the first one served, and milliseconds after the first enchilada hit my plate I wolfed the whole thing down, still standing, chewing just long enough so it wouldn’t get lodged in my throat as I quickly swallowed each bite. After a few seconds I looked up to see my friends staring at me in horror.  I wanted to explain to them that I am not this ravenous unmannered ingrate that can’t wait for everyone else to be served before I start eating. I was searching for the words to convey the feeling of never knowing when my one year old will start launching his cheerios off the high chair, or when my 3 year old will finish eating peanut butter with his fingers and then run straight for the white couch.  For these reasons I am often standing alert and ready while eating at the dining table waiting for the next food “attack”. But my friends are not yet parents and they would not understand. So instead, I took another helping and ate very very slowly to overcompensate for my previous gorging and hoped they noticed my flawless fork and knife technique.
I’m not saying every meal I have with my kids is crazy. But there have been enough episodes that have kept me on my toes. So if you are having one of those challenging days, I found the perfect pancake recipe that is really easy and quick to make. More importantly, it has the added bonus of stacking each piece on top of each other which gives the dish added height just in case you have to stand up and eat. 
Fluffy Pancakes


INGREDIENTS:
3/4 cup milk
2 tablespoons white vinegar
1 cup all-purpose flour
2 tablespoons white sugar
1 teaspoon baking powder
1/2 teaspoon baking soda
1/2 teaspoon salt
1 egg
2 tablespoons butter, melted
cooking spray
PREPARATION:
1. Combine milk with vinegar in a medium bowl and set aside for 5 minutes to “sour”.

2. Combine flour, sugar, baking powder, baking soda, and salt in a large mixing bowl. Whisk egg and butter into “soured” milk. Pour the flour mixture into the wet ingredients and whisk until lumps are gone.
(The batter will initially be separated and bubbly, just keep stirring. It will also be pretty thick. This is fine, do NOT add more milk or anything to thin it out.)

3. Heat a large skillet over medium heat, and coat with cooking spray. Pour 1/4 cupfuls of batter onto the skillet, and cook until bubbles appear on the surface. Flip with a spatula, and cook until browned on the other side.

Serve with syrup, fresh berries and whip cream, or a fresh fruit puree. 

Easy Broccoli and Spinach Quiche

There is a PQ near my son’s nursery and we often go there for lunch after I pick him up. We have our own little ritual. As we walk in, the negotiations immediately begin.  Rayan wants to eat either a chocolate tart or éclair for lunch. I then attempt to talk him down to something with a bit more nutritional value such as a croissant or blueberry muffin. We then come to a deadlock which is broken by Rayan screaming “Mommmmyyy Peepeeeeee” and then running through the café to the bathroom. Aadam also likes to chime in at this point with a little screech of his own.  

The good thing about the bathroom break is that it serves as a distraction, and I can sneak in my order of a healthier lunch option. Today I ordered the salmon and spinach quiche du jour, and quickly found some seats outside so the eating (flinging) of food could commence.  The quiche was light and fluffly and amazingly more ended up in my kids’ mouths than on the floor. We were soon finished and a small team of waiters was dispatched to clean our table and its surroundings. As waiter no. 1 was removing my plate she said, “Madame tomorrow we are starting our new kids menu.” Waiters nos. 2 and 3 quickly shot her a sharp glance and she knew she had said too much. The last thing they wanted was to give us any more incentive to frequent their restaurant. But luckily for everyone, I have a quiche recipe that is easy to make at home. My kids love it, so I foresee more quiche at home and less at PQ. Although I do love their lemon tart so I cannot stop going there altogether…
Easy Broccoli and Spinach Quiche


INGREDIENTS:
Puff pastry sheet ** OR make own quiche crust. Recipe below.
3 eggs
¾ cup heavy cream
¾ cup whole milk
Salt and pepper to taste
1 teaspoon oregano
1 large red onion
¾ cup grated emmental (or any cheese you prefer)
1 -2 cloves garlic
1 ½  cup cooked broccoli
½ cup cooked frozen spinach, thawed and drained

PREPARATION:
1.  Roll out puff pastry to line round 9” tin up about 1 ½ inches on sides.

2.  Pulse onion in food processor and add on puff pastry.

3. Pulse broccoli, spinach, and garlic in food processor. Add in oregano, generous amount of fresh pepper and salt to taste (about ¼ tsp salt). Mix well.

4. Layer vegetable mixture on top of onion.

5.  Layer ½ cup cheese on top of vegetable mixture.

6.  In separate bowl mix eggs, milk, cream, and some salt and pepper with electric mixer. Add on top of other items in pan.

7. Top with remaining ¼ cup cheese.

8. Bake in oven at 350F (180C) for 50 minutes. Let sit for 10-15 minutes before cutting.


**Just found a recipe here for a homemade quiche crust. See below:


Homemade Quiche Crust


Ingredients:

  • cup flour
  • 1/2 teaspoon salt
  • 1/4 cup olive oil or 1/4 cup canola oil
  • 1/4 cup ice water (I use refrigerated water)

  • Preparation:
  • 1. Mix flour and salt with fork.
  • 2. Beat oil and water with whisk or fork to thicken.
  • 3. Pour into flour and mix with fork.
  • 4. Press into 9″ pie crust.
  • 5. Fill with quiche mixture and bake at 400F until done.


  • Breakfast Burrito and Salsa

    My baby has the most delicious thighs. Little pudgy rolls of yummy goodness. As I pulled him out of his highchair after breakfast today, a piece of strawberry and a couple of cheerios fell out from between his thigh rolls! At first I was amused. But then I silently prayed,  Oh God please don’t let me ever get that fat so that could happen to me.

    Truth be told, I did look at the positive side in case I did get in that condition. For example, suppose I had to work through lunch. Instead of starving, I could just lift up my skirt, give my leg a little shake,  and out would pop a pizza and a few fries. Pretty convenient, yes?  But no, the social and health problems would definitely outweigh (haha) any advantages.

    So, out of fear of raising the next generation of thunder thighs, I am always challenging myself to find healthy but tasty meals to feed my family.  Breakfast in particular has always been a hard meal for me to cook since I was never much of a breakfast person myself. I never knew what to make. Then one morning, I came up with this breakfast burrito with tomato salsa recipe that is extremely satisfying and my go-to recipe for when I’m stumped on what to cook. It is also versatile, you could eat it for any meal of the day, and it can even be made with store bought salsa if you are in a time crunch. 


    Easy Breakfast Burritos with Fresh Tomato Salsa  (Makes 2 Burritos)


    INGREDIENTS for Burritos:

    2 soft corn or flour tortillas
    ¾ cup grated cheddar cheese
    Prepared tomato salsa (recipe to follow)
    2 large eggs, lightly beaten
    Fresh black pepper and salt to taste
    Avocado, Sour Cream, Spring Onions for garnish

    PREPARATION:

    Heat a skillet on high, then coat skillet with cooking spray. Add the eggs, 2-3 tablespoons of salsa, and ¼ cup cheese. Add some fresh black pepper. Scramble all together until eggs scrambled and most of water is evaporated.  About 2 minutes. Keep aside and keep warm.

    Heat a clean skillet on high heat, then coat skillet with cooking spray.  Lower heat to medium and add tortilla and flip a couple times,  about 3 seconds per side until tortilla is hot.  Put ¼ cup cheese in a line down middle of tortilla and heat until cheese is melted.  Transfer tortilla to plate.  Immediately add half the egg mixture on top of the melted cheese and fold over both sides of the tortilla so it looks like a burrito. Top with salsa, sour cream, spring onions and avocado slices, or garnish as desired. Repeat whole process using rest of egg mixture and other tortilla.


    Fresh Tomato Salsa  (Makes approximately  1 ½ cups prepared salsa)


    INGREDIENTS:
    3-4 medium tomatoes
    1 small piece white onion  (approximately one square inch)
    1 small cilantro bunch (stems removed, about ½ cup)
    Few sprinkles Garlic powder
    2 – 3 slices pickled jalepeno (more or less depending on how spicy you want it)
    ¼ tsp salt (or to taste)

    PREPARATION:   Halve tomatoes and put in food processor (NOT blender)  with the rest of  ingredients. Pulse until desired consistency.  Adjust seasonings to taste.  

        Banana Muffins

        Oh, do you know the muffin man,
        The muffin man, the muffin man,
        Oh, do you know the muffin man,
        That lives on Drury Lane?


        My kids love that song. And I must admit it is rather catchy. Luckily it was stuck in my head as I was wondering what to do with my toddler this afternoon. 


        Muffins! We will bake muffins! After trolling online through seemingly endless muffin recipes I finally found one that satisfied my holy trinity of baking recipes:  healthy, easy, and delicious! It seemed too good to be true. But these banana muffins from Cat Can Cook looked amazing! So, measuring cups in hand, we hoped to make our muffin magic.


        With over 1000 positive comments on her site for this recipe, Cat was right. Not only were these moist and delicious but  they were so easy that my 3 year old practically made them by himself. What a fun and yummy afternoon of mommy-son bonding. 


        Banana Muffins (makes 12 muffins) from Cat Can Cook


        3 or 4 Large bananas, mashed (the more bananas the moister, so I use 4)
        1/2 cup white sugar (original recipe calls for 1 cup, but I don’t like them too sweet)
        1 slightly beaten egg
        1/3 cup melted margarine or butter
        1 teaspoon baking soda
        1 teaspoon baking powder
        1/2 teaspoon salt
        1 1/2 cups flour
        Mix the mashed banana, sugar, egg and margarine together. Set aside. In a separate bowl, mix together baking soda, baking powder, salt and flour. Mix wet and dry ingredients all together. Pour into greased muffin tins, and bake in 350 degrees F oven for approximately 12-18 minutes. Enjoy!