Pineapple Upside Down Cake Recipe

IMG-20160611-WA0012-01

When it comes to food, I’m generally a purist. I prefer a classic mac and cheese with a fabulous creamy cheddar as opposed to the  countless varieties on trendy menus with numerous add-ins like artichokes, spinach and feta, or herbed truffle oil.

IMG_20160713_172719

My Star Wars/Lego cake – all the bling but without the zing 😦

With cakes I am the same way. Nothing like a luscious chocolate cake with a rich chocolate ganache topped with some fresh sliced strawberries to brighten my day. But somehow, I lost my way from the simple path. It hit me while I was removing the hardened candy melts out of the Lego molds and sticking on (inedible!) Darth Vader heads on my son’s birthday cake. Where were the all natural ingredients and simple garnishes? What I had before me was some flashy frosted thing that was admittedly pretty fun, but somehow fell flat.

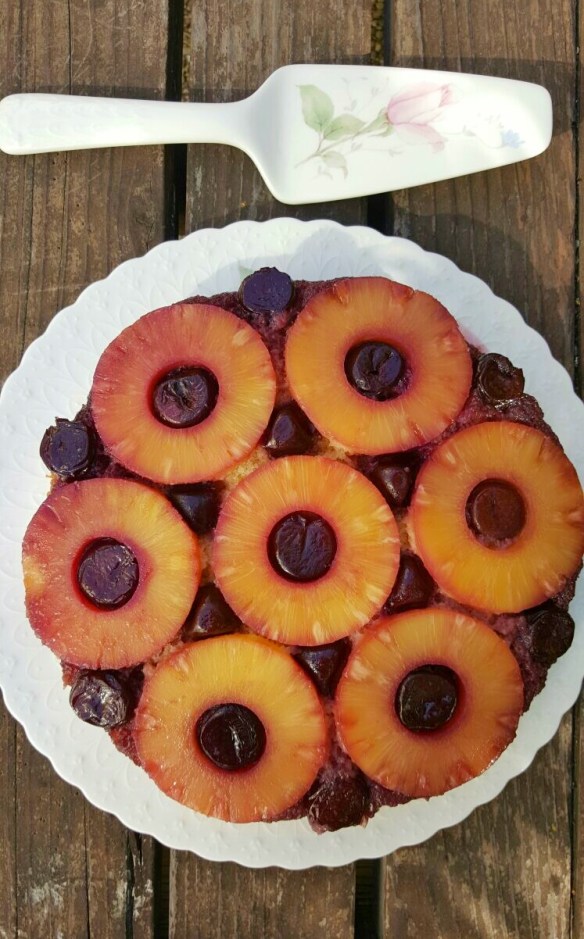
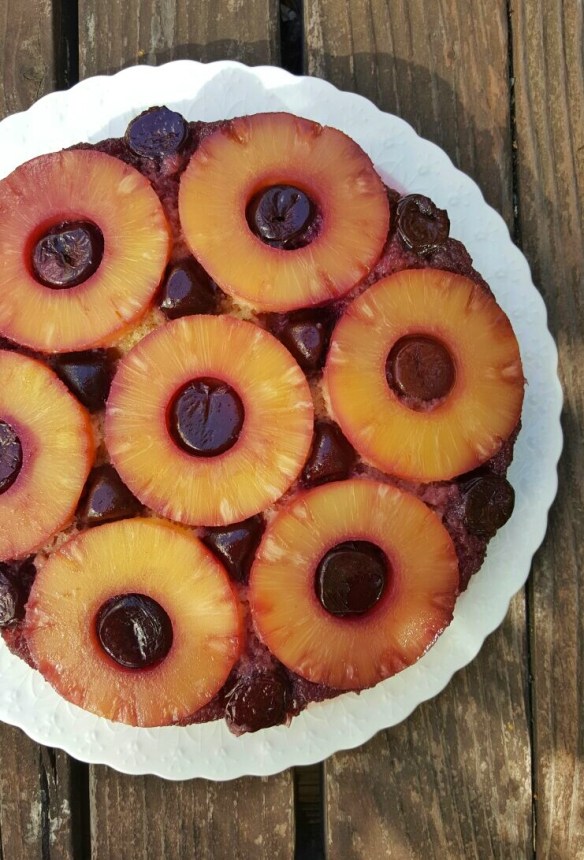
Don’t get me wrong. I am all for trying new foods and cuisines and experimenting with new flavor profiles and combinations. But sometimes it isn’t about adding all the new bells and whistles, but instead just keeping it simple and celebrating each ingredient. One of my favorite cakes is a pineapple upside down cake. You won’t find it on the dessert menu of the hottest new restaurant in town, but it never fails to please. Enjoy it warm after taking it out of the oven with a scoop of vanilla ice cream, or take it to almost any occasion (barbecue, potluck, baby shower) for an elegant and delicious dessert. I have tried many pineapple upside down cake recipes, but this is seriously the best one since it has a thin layer of cake providing the optimum topping to cake ratio. Hope you love this as much as I do!

Pineapple Upside Down Cake Recipe

IMG-20160611-WA0016-01

Ingredients

For the topping:

  • 50g softened butter
  • 50g light soft brown sugar
  • 7 pineapple rings in light syrup, drained with 2 tablespoon syrup reserved
  • fresh pitted cherries (can use frozen cherries too if not in season)

For the cake:

  • 100g softened butter
  • 100g sugar
  • 100g self-raising flour
  • 1 teaspoon baking powder
  • 1 teaspoon vanilla extract
  • 2 tablespoon reserved
  • 2 eggs

Note: You really need to get a scale for this recipe to ensure perfect and consistent results, but you can also try and use conversions from here.

Method

  1. Preheat oven to 350F/180C. For the topping, beat the butter and sugar together until creamy. Spread over the base and a quarter of the way up the sides of a 9inch/20-21cm round cake tin. Arrange pineapple rings on top, then place cherries around the rings.
  2. Place the cake ingredients in a bowl and, using an electric whisk or mixer, beat to a soft consistency. Spoon into the tin on top of the pineapple and smooth it out so it’s level. Bake for 35 mins. Leave to stand for 5 mins, then turn out onto a serving plate. Serve warm with a scoop of ice cream.

Easy Homemade Almond Milk

20160603_075333-01

As much as I love dairy, in the back of my mind I knew I had to let it go. The immense joy from consuming some of my favorite foods like towering ice cream sundaes, melty baked brie, and creamy lattes was becoming shorter and shorter lived. (Not to mention my clothes were becoming tighter and tighter!)

I decided to take some action on improving my diet and a friend told me about the Whole30 which encourages eating non-processed food and bans many foods that cause inflammation. One of the things it tells you to give up is dairy. I figured the milk in my daily lattes was the main culprit and decided to switch it out. But I couldn’t stomach drinking black coffee though. I wasn’t a fan of coconut, soy, or rice milk, but was delighted to find out I loved almond milk. But then the Whole30 bans carrageenan (which is a plant extract food companies use as a thickening agent) which was of course included in the only brand of almond milk I liked.

I decided if I am embracing non-processed foods, I might as well try making it myself. Most homemade almond milk recipes used phrases like “soak overnight” or “peel 1 cup of almonds” and other work intensive words that a busy mama does not have time for. Instead, I found an easy shortcut version using just a few ingredients. And the best part is not only does it save you money, but it tastes better than packaged almond milk too. You will love it!

20160603_073709-01

All you need to make delicious almond milk – dates, almond butter, and vanilla extract. Just add water!

Easy Homemade Almond Milk Recipe 

20160603_075228-01

I have just blended this – so it is still frothy and you can see the little grainy bits. They will soon settle to the bottom. You can strain them with a nut milk bag if you wish.

Ingredients:

1 1/2 Tablespoon Almond Butter (I grind my own but you can use store bought as well)

2 Pitted Dates

1/2- 1 Teaspoon Vanilla Extract

4 Cups Water

Method:

1. Place all ingredients in blender (I used my Vitamix) and blend. (usually 30 seconds or so – it will be all frothy or milky.

2. Chill in fridge and enjoy. (There are some grainy bits from the dates, so you can strain it with a nut milk bag if you want, but it is sooo small and settles to the bottom so that it does not bother me. Plus extra fiber!) Almond milk keeps in fridge for 3 days or so.

Spaghetti Squash “Pad Thai”

20141205_130731_1

I am not a cold weather person. I love sun and warmth and frolicking on warm sandy beaches. But now it is winter. Initially I was shivering under my down comforter waiting for the sun to come back, but slowly I have come to appreciate certain things about the cold season. I love feeling the crunch of leaves under my new boots while walking on the sidewalk, the sound of crackling sparks from the logs in the fireplace, and curating my ever expanding winter wardrobe of gorgeous scarves and coats and sweaters. But most of all, I love to eat all the “comfort food” that makes me feel warm and fuzzy inside.

Things like hot chocolate with melty marshmallows, hearty meaty stews, creamy soups in flaky bread bowls, and any big bowl of pasta with plenty of sauce. Unfortunately every food I am craving is a giant carbohydrate overload. I am living in paleo, gluten free, vegan, low-carb California, and eating all the typical comfort food is often looked upon with judgement from my fellow health conscious Californians. Luckily there are alternatives. Instead of eating spaghetti and meatballs, I can use spaghetti squash for the pasta which several of my paleo friends have been advocating for some time now. To be honest, it does look like spaghetti and meatballs, but it definitely does not taste like it. My comfort food seeking side was not too happy with this substitution. I just couldn’t mess with a classic.

But actually,  my paleo peeps were on to something. I like the idea of substituting the spaghetti squash for noodles: Low-carb and an additional serving of vegetables (win-win!).  I needed another option besides a tomato based sauce, and found a recipe with a peanut sauce and Asian flavors similar to Pad Thai.  I also loved the crunch of the crushed peanuts and the option to add any other vegetables such as chopped red peppers or vegetable sprouts. In fact, I liked this dish so much that I am considering buying a spiralizer to make noodles out of zucchini. But will be saving that for another winter day though…

Spaghetti Squash “Pad Thai” Recipe

20141205_130612_1

INGREDIENTS

For Squash:

  • 2 medium spaghetti squash
  • olive oil
  • salt/pepper
  • 1 teaspoon minced garlic
  • ¼ cup chopped parsley or cilantro
  • ¼ cup crushed peanuts **Note: Blend in food processor. Do not leave this ingredient out, it adds nice crunch and texture

For Peanut Sauce:

  • 1 can (14 ounces) coconut milk
  • ⅔ cup natural, unsweetened peanut butter **Note: You could probably use regular peanut butter, but if you do, omit the sugar/agave
  • ¼ cup sugar or agave
  • ¼ cup water
  • 2 tablespoons soy sauce
  • 2 tablespoons white or apple cider vinegar
  • 2 teaspoons sesame oil
  • 2 teaspoons red curry paste
  • 1 teaspoon Sri Racha chili sauce (optional)

METHOD:

1. Preheat oven to 350 F. Half the squash and scoop out the seeds.

2. Drizzle inside with olive oil and sprinkle with salt and pepper. Place spaghetti squash cut side down on a baking sheet lined with foil and roast for 45 minutes or until soft.

3. Remove squash from oven and let cool for 10 minutes. Take fork and scoop out the squash. It should come out in little strands that look like noodles. Set aside.

4. While squash is roasting, place all sauce ingredients in a medium saucepan and bring to a boil over medium-high heat. Then turn down to low and simmer for 5 minutes while stirring almost constantly.

5. After sauce thickens a bit, take off heat and set aside. (I liked mine on the thicker side so let it cook for awhile longer).

6. Heat a skillet over medium heat and add olive oil.  Add minced garlic, and cook for a minute. Add spaghetti squash, ½ -¾ cup of the peanut sauce pan, chopped cilantro, crushed peanuts. and combine. Stir to combine and cook until heated through (about 2 minutes).

7. Plate and garnish with a little more crushed peanuts and chopped cilantro. Can also add some bean sprouts or other vegetables if desired. Add more sauce if needed. Serve immediately.

Yield: 3-4 servings as main (5-6 as a side)

Based on this recipe from Leelalicious.

Vegetable Khichidi Recipe

I have a confession to make. I call myself the Pantry Diva but there are times when even my pantry is bare. We were on vacation this past week and were eating out often, and I did not do my usual grocery shopping. Of course my lack of meal planning had no impact on my family’s incessant daily hunger pangs. One evening, we just returned from the beach and everyone was starving. I needed to make something fast and with literally no ingredients on hand. I decided to make khichidi, which is a one pot meal of rice and daal and vegetables and spices.

Image

I use basmati rice and masoor daal for my khichidi

You can throw any veggies or spices you have on hand, but usually less is more as it is a simple dish and you don’t want to have too many flavors competing with each other. So, while everyone showered I soaked the daal and rice (as I am too paranoid to buy a pressure cooker) and then quickly cooked the khichidi. I usually rate any dish’s success not by its taste or ease of cooking but instead by if my kids eat it or not…and they devoured it! (OK they were starving but hey I take any cooking successes I can get!)

As everyone was scarfing down my khichidi, I was putting all the spices back in my cupboard and I noticed one in particular: Hing.

Image

Hing (Asafoetida) can be bought in Indian grocery stores.

Hing? Although I have been using it for years, I realized I didn’t know much about it. I wondered what exactly is this strange spice and why does it make the khichidi taste so good? After some googling I found out Hing (Asafoetida in English) is a dried and ground resin extracted from a plant. Based on its unpleasant smell in its natural form, hing has been called such names as “Devil’s Dung” or “stinking gum”. This initial information was not encouraging me to find out more about hing. But I kept reading, and it got better: We usually buy hing from the supermarket in its commercial form not fresh form, so the flavor and smell is much more mild. It adds a savory flavor to the food similar to sautéed onion and garlic. In addition to being a flavor enhancer, it also has some health benefits such as aiding digestion and reducing gas. You can find more information about Hing here and here.

Image

Because the khichidi recipe is so versatile, you can add any combination of veggies and spices. I have made it both with and without hing and trust me, you need it. Although it has a subtle flavor, hing is the one spice that is essential in a tasty khichidi. You don’t notice it when it’s there, but you definitely miss it when it’s gone. And remember, a little hing goes a long way…you don’t need to use much. You can find it in any Indian grocery store if your local supermarket doesn’t have it. Apparently it is used in many other Indian dishes too so feel free to experiment. Add Hing (Asafoetida) into your pantry today!

Pantry Diva Tip: This khichidi recipe required grated fresh ginger, and I had no time to go shopping. Store your fresh ginger in the freezer, it keeps for a really long time. When a recipe calls for fresh ginger, just take it out of the freezer, grate what you need, and put it back in. No need to run to the store each time you need ginger!

Vegetable Khichidi Recipe

Image

INGREDIENTS:

1 Cup Basmati Rice

½ Cup Masoor Daal

2-3 cups water 

NOTE: I tend to add more water (about 3 cups water) as I like the khichdi texture kind of “goopy”and stuck together, not like separate grains of rice. Feel free to reduce amount of water. But, if you have NOT presoaked the rice and daal, you can add more water and increase cooking time.

2 teaspoons cooking oil

1 onion, chopped fine

1 teaspoon ginger, grated

1 bunch coriander, chopped (optional for garnish)

1 teaspoon Hing (Asafoetida)

1 teaspoon cumin seeds

½ teaspoon mustard seeds (optional)

½ teaspoon turmeric

Red chili powder,to taste

Salt, to taste

¾ cup peas (frozen ok)

Yoghurt (optional – to serve with khichidi)

NOTE: My recipe above is just a guide. You can add any vegetables you have on hand such as grated carrots, cauliflower, broccoli, peas, etc. You can also add different spices, such as coriander powder, cumin powder, garam masala, black pepper, ginger, garlic. Just remember that this is a simple dish and you don’t want too many flavors competing with each other. Less is more!

PREPARATION:

1. Wash rice and daal and soak for 20 minutes. Note: You do not need to soak beforehand but then you must increase water and cooking time.

2.  Heat oil in a pot, and when hot add the cumin seeds, mustard seeds and hing and stir for a minute.

3. Add chopped onion and stir until very light brown.

4. Add ginger, chili powder, turmeric, and salt and sauté for a few minutes.

5. Add drained rice and daal and mix.

6. Add water and peas and any additional vegetables. Heat until boils.

7. Cover pot and and cook on low heat until rice is done. It is usually done when there are little holes on top of the rice and the water has evaporated.

8. If desired, garnish with chopped coriander and serve with yoghurt or raita.

Barbecue Delights in Downtown Dubai and Banjan Borani (Afghani Eggplant) Recipe

Being a food blogger definitely has its perks, and one of them is receiving invitations to fabulous foodie events around town. Barbecue Delights, a restaurant specializing in Pakistani, Afghani, and North Indian cuisines, was hosting a lunch at their newest location in Downtown Dubai, and I was one of the lucky food bloggers invited.

Image

Barbecue Delights downtown location

Image

Upon walking into the restaurant, I was immediately drawn to the beautiful artwork on the walls, inspired by the colorful way in which trucks are designed in Pakistan. The restaurant had commissioned an artist from Pakistan who makes “Truck Art,” and he flew all the way to Dubai to see the panels fitted together and mounted on the wall. The finished result is striking.

Image

Beautiful “Truck Art”

On a side note, my husband is Pakistani. When I visited Pakistan, I loved seeing all the colorful busses and trucks driving around, and was constantly pointing out how beautiful they were. I even bought a postcard with the colorful trucks on it, much to the amusement of my local Pakistani family. So seeing the “truck art” on the wall was a fun (and beautiful) reminder of those memories.

Image

So back to the meal. After being seated we were welcomed with a refreshing beverage of green mango blended with cumin while we perused the menu’s selection of appetizers which were about to arrive. The starters were a Rocca Salad, both Aloo and Keema naan, and an Afghani Mutton Rosh, which is a hearty stew of mutton, vegetables and aromatic spices.

Image

Afghani Mutton Rosh

After the appetizers, came a selection of naan and barbecue items such as Malai Boti, Gola Kabob, and Hara Fish, boneless cubes of fish marinated in fresh herbs. But the real star of this course was the Mutton Ribs, a fall-off-the bone tender rack of mutton steamed and grilled in a rich and spicy marinade. I was told Barbecue Delights sources all of their mutton from Pakistan from the best high quality suppliers. The ribs were a testament to that quality.

Image

Malai Boti, Boneless chicken marinated in cream, milk, and herbs and spices

Image

Although I was stuffed at this point, I realized the main courses still hadn’t been served. Before I knew it, Chicken Karahi, Prawn Masala,  Afghani Pulao, Daal, and Banjan Borani was placed before me. The Banjan Borani seemed to be the blogger favorite of the afternoon. It is an Afghani eggplant dish, with a garlicky yoghurt and tomato sauce. It has simple yet bold flavors and an elegant presentation. I have written the recipe at the end of the post so you can create your own Banjan Borani at home.

Image

After the mains we finally moved on to dessert of jalebi, kheer and pistachio ice cream. I cannot end any meal without dessert, even a very very large filling one, so I gobbled a few jalebi before leaving, loving the sticky sweetness of every bite. As we left, we received a beautiful parting gift of a colorful little rickshaw so I can showcase a little “truck art” style at home.

Image

Barbecue Delights Locations:

Downtown Dubai-Clarens Building

Mohd Bin Rashid Boulevard (formerly Emaar Boulevard)

Tel: 04 4343 443

 The Walk in Jumeirah Beach Residence

Adjacent to Sofitel Hotel, Dubai

Tel: 04 4230632

Lamcy Square, Oud Mehta Road

Near Movenpick Hotel, Dubai

Tel: 04 3359868/69

Note: I was a guest at a lunch hosted by Barbecue Delights. Some of the images in this post are from Barbecue Delights

Barbecue Delight’s Banjan Borani – Afghani Eggplant RecipeImage

INGREDIENTS:

500g (About 1 pound) Eggplants, cut into round slices

500g (About 1 pound) Yoghurt

15g (1 tablespoon) Garlic paste

5g (½ teaspoon) Cumin seeds

5-10g (1-2 teaspoons) Olive oil

100g (about ½ cup) Tomato paste

15g (1 tablespoon) vinegar

Salt and Pepper for seasoning

Coriander for garnish

Olive oil/Cooking oil for frying

PREPARATION:

1. Fry OR bake eggplant slices until cooked.

If frying, heat oil in pan and fry on both sides for a couple minutes until cooked.

If baking, brush each side of eggplant slice with olive oil and sprinkle both sides with salt. Bake at 450F for about 10 minutes each side or until done. Remove and cool.

2.  Add garlic paste into yoghurt. Saute cumin seeds in oil and add into yoghurt. Mix well.

3. Mix tomato paste and vinegar in a small bowl.

4. Spread a layer of yoghurt on serving dish. Place cooked eggplant slices on yoghurt. Spread the tomato paste mixture on top of eggplant slices. Add a bit of yoghurt on eggplant. Garnish with chopped coriander.

Spinach, Feta and Onion Quiche

Image

When I first moved to Dubai, it was all about brunch. Friday brunch is an institution in Dubai, and since I was not yet a mother, Friday brunch had soon become my weekly tradition.  I had endless hours to eat, drink, and be merry. (I also had endless hours to recover the next day, as I used to do this thing called “sleep.” ) But now that I have two very rambunctious boys, I cannot just laze around for hours doing brunch. With my new time constraints, I have now moved on to breakfast or shall I say “brekkie.” It fits into my current lifestyle well as breakfast is so early in the day, an essential quality for my little early risers, as well as being a relatively quick meal so we can go out and do other things.

At first I was not accustomed to eating much at breakfast. In the past, I never had much appetite early in the morning (probably because I was still sleeping). But if I did happen to be awake, I would eat some cereal at the most. Soon, as my brekkie dates got more regular, I noticed I would always order the same thing: quiche. I loved how no matter what type of quiche I would order, it would always taste good…smoked salmon and chives, artichokes and onions and cheese, roasted red pepper and feta…the delicious combinations were endless.

The funny thing is that I always thought of quiche as something I could only buy at a restaurant, and not something I could make at home. Homemade crust? I thought that must surely take ages and won’t be easy to do with my little monkeys running around.  It was not until I went to my friend’s place for breakfast (who has 3 kids) and served me homemade quiche at 9:30am straight out of her oven that I realized quiche was a home made brekkie possibility. I did try one version here, but I have since simplified it and have an even easier, tastier and healthier version I make now. I am constantly trying to get my kids to eat more veggies, and they actually like this!

This recipe takes less than 30 minutes to prepare so it is definitely something you can throw together quickly (and clean up while it bakes), or even make ahead and rewarm later. I would love for you to try it and let me know how it turns out. I would also love to hear your favorite quiche recipe or flavor!

Pantry Diva Tip: Feel free to use up any veggies or cheese you have hanging out in your fridge, quiche is a great way to clean out that veggie drawer!

PS. Hubby eats this too…yes men do like quiche, they just don’t always admit it!

Spinach, Onion and Feta Quiche

Image

Crust Ingredients:

1 cup flour

1/2 teaspoon salt

¼ cup melted unsalted butter OR 1/4 cup olive oil  OR 1/4 cup canola oil

1/4 cup ice  water (I use refrigerated water)

Filling Ingredients:

1 red onion

2-3 cloves garlic

2 bunches fresh spinach, chopped, thick stems removed, or baby spinach (6-8 cups)

4 eggs

1  ½ cups lowfat milk OR ¾ cup whole milk and ¾ cup heavy cream if want a denser and creamier consistency (I use lowfat milk and it tastes great!)

Reduced fat low salt feta cheese, or any cheese you prefer

Extra virgin olive oil

Salt and freshly ground black pepper to taste

Crust Preparation:

1. Mix flour and salt with fork.

2. Beat oil (if using) and water with fork to thicken and pour into flour and salt. If using butter, just pour directly into flour with water.  Mix with fork until the dough holds together.

3.  Press dough into 9″ round pan OR roll out dough on silpat liner with rolling pin and press into 9” round pan. (I prefer the roll out method as it is faster and more uniform, although it does compromise on the flakiness of the crust. Either method is fine!)

Filling Preparation:

4. Chop onion and garlic in chopper.

5. Heat olive oil in pan and sauté onion and garlic for a couple of minutes, then add chopped spinach and sauté until it is wilted. Season with salt and pepper and let cool. Add spinach mixture into the prepared crust.

6. In separate bowl, beat eggs, milk ( and cream if using) with salt and pepper with mixer. Pour over the spinach mixture in crust.

7. Top with crumbled low fat reduced salt feta cheese, or any cheese of your choice.

8. Bake at 200C/400F until done, around 35-45 minutes. Let cool for 10-15 minutes before cutting.

Watermelon Curry and Pantry Diva Live at Blogger Week

I am one of those people who fantasize about having my own cooking show on TV. Sometimes when I’m in my kitchen, I pretend I’m on the Food Network show “Chopped”, where I have a mystery basket of ingredients and have to make an amazing dish for the harsh judges before time runs out.  Actually now that I think about it, this scenario isn’t too far off from the daily dinner rush at home with my family of angry judges hungry kids.  

Image

Although winning “Chopped” would be amazing, what I really want is to have my own cooking show where I connect with my fans and share delicious recipes. This Friday I got to do just that, when I took part in the “Meet the Blogger Week” event sponsored by Lootah Premium Foods at Lafayette Gourmet.

Image

It was an amazing experience to put on the microphone and make my watermelon curry in front of a live audience. The live interaction with the crowd really forms a connection you just cannot get from behind a computer. Blogger week is still going on until September 23rd, with cooking demos at 12 noon and 4pm. You can also win a trip to Mauritius by posting your picture from the event on Instagram; just caption it #LPFbloggerevent and tag @Lootahpremiumfoods.

Image

My dish for the event was a Rajasthani watermelon curry. Although it is called a curry, I think of it more as a light first course (served chilled or room temperature like a borscht or a spicy soup), or as an additional side dish complementing other sides (like daal or sabzi) in an Indian meal.  The watermelon curry can be eaten hot or cold and is a combination of sweet, sour, and spicy flavors. I find is especially refreshing to enjoy during the scorching summer months in Dubai.

Pantry Diva Tip: This is a great way to use up excess watermelon after a barbecue or party. This is also an easy dish to make if you are short on time and need to quickly dash to the store, as all the ingredients should be in your pantry except the watermelon!

Watermelon Curry

ImageINGREDIENTS:

 2kg (4.4 pounds) watermelon pieces cut into 1.5 inch cubes (seedless watermelon if possible)

1 teaspoon paprika powder

½ teaspoon red chili powder (to taste, leave out if prefer mild flavor)

1 teaspoon turmeric powder

1 ½  teaspoon coriander powder

1-2 teaspoon garlic puree

Salt to taste

2 tablespoons vegetable oil

1 teaspoon cumin seeds

 Juice of 2 large lemons

Sugar to taste (optional)

Coriander (for garnish optional)

PREPARATION:

1. Cut watermelon into 1.5 inch cubes, and divide 1.5kg (3.3 pounds) for the curry, and 500g (1.1 pound) for the juice.

2. Take 500g (1.1 pound) watermelon cubes and make sure there are no seeds. Puree in food processor to make juice. To the juice add: paprika, turmeric, chili, and coriander powders, garlic puree, and salt. Set aside.

3. Heat vegetable oil in wok and add the cumin seeds, and after 20 seconds add the juice. Lower the heat and simmer for 5 minutes or until the liquid reduces by a third. If using sugar, add now, and also add the lemon juice. Cook for another minute. (I prefer to leave out the sugar as I feel the watermelon is sweet enough).

4. Add the 1.5kg (3.3 pounds) cubed chopped watermelon and cook over a low heat for 4-5 minutes. Gently toss while cooking so all the pieces are covered in the spice mixture. Turn off heat and garnish with coriander if desired.

Serves 4 as a first course or 6-8 as a side dish

*Recipe inspired by The Great Curries of India by Camellia Panjabi

My first post as Pantry Diva – Shakshuka: Poached Eggs in Tomato and Chickpea Sauce

Image

Hello Everyone! So this is my first post as Pantry Diva instead of Khana Mama. This change came about because when people would ask me, “So what is your blog about?”, I always found myself struggling to come up with a succinct answer that would summarize the idea of my blog. So during a brainstorm session with friends, the concept of Pantry Diva was born. I am rejoicing that I now have a tagline: “Making fabulous things from everyday ingredients found in your pantry.” Oh joy!

The main difference in Pantry Diva is that I now have a clear direction in writing. But the theme of simple, healthy recipes will remain the same. And by the way, all of the old Khana Mama posts have been transferred to Pantry Diva so nothing has been lost. I still have a bit of reformatting to do, but that will come in time. Please bear with me!

It is actually lucky that I already have my blog in place, because my first recipe required the finesse of a true Pantry Diva. Yesterday, the 46th floor in my building had a broken pipe, and water was spewing down the whole building. This flood had forced the temporary closure of all our elevators. I was home with hungry children and dinner time was quickly approaching. I live on the 21st floor so my options were:

A. Walk down to grocery store to buy items and then walk back up and cook.

Yea right.

B. Walk down with children to restaurants below.

Assuming we would even make it, this would cause them to be hungrier and crankier.

C. Order food and make the poor delivery guy walk up to our place.

Tempting…but again not the healthiest option and unsure about delivery time.

D. Look in the old pantry and see what I can whip up.

Walking is not something we do much here in Dubai, and no I will not send my maid down in this heat…so ‘option D’ was the winner.

As I was looking through my well stocked pantry I remembered this past summer when I was visiting my family in California and needed to throw together a quick meal without a trip to the store…I made my version of Shakshuka and everyone loved it. It is traditionally a Middle Eastern breakfast dish of poached eggs in a tomato sauce, but you can enjoy it anytime. You can serve it with Arabic bread, pita, rice, or any bread you have lying around. I like to eat it plain too!

Image

 Shakshuka: Poached Eggs in Tomato and Chickpea Sauce

INGREDIENTS:

2-3 teaspoons olive oil

1 medium onion, finely chopped

5 garlic cloves, minced

2 jalapeños, seeded, finely chopped (optional- pickled jalapenos in a jar work too)

½ cup of roasted red peppers (optional – I just had these lying around so I added them in)

1 15-ounce can chickpeas, drained and rinsed

1 tablespoon paprika

1 teaspoon ground cumin

¼ teaspoon cayenne or red chili powder (optional or to taste)

2 14 oz. cans of chopped tomatoes

¼ cup toasted pine nuts (optional for garnish)

Salt and freshly ground black pepper to taste

1 cup coarsely crumbled feta (goat cheese or any cheese you prefer)

6-8 large eggs

Small bunch chopped fresh coriander (Or any herb you like – you can keep extra fresh herbs frozen in olive oil or just chopped and frozen in ice cube trays so you have some on hand all the time)

Warm pita bread (or rice or any bread you like)

PREPARATION:

1. Preheat oven to 425°F (220C). Heat oil in a large ovenproof skillet over medium-high heat. Add onion, garlic, and jalapeños; cook, stirring occasionally, until onion is soft, about 6-8 minutes. Add paprika, cumin, and cayenne and chickpeas and cook for 1-2 minutes longer.

2. Add canned tomatoes and their juices. Add red peppers if using. Bring to a boil, reduce heat to medium-low, and simmer, stirring occasionally, until sauce thickens slightly, about 15 minutes. Season to taste with salt and pepper.

3. Sprinkle feta evenly over sauce.

4. Crack eggs one at a time and place over sauce, spacing evenly apart. Transfer skillet to oven and bake until whites are just set but yolks are still runny, 5–8 minutes. (I kept mine in for 8 minutes and they were pretty much cooked through. Also it’s better if you keep the eggs on the surface instead of making little wells and letting eggs touch the bottom of the pan otherwise they overcook immediately).

5. Garnish with cilantro and pine nuts. Serve with pita for dipping.

By the way, if you hate eggs, just leave them out! It is delicious without them too.

Shakshuka  recipe inspired from Epicurious.

Black Bean Salad

In most countries, when you meet someone for the first time, a good ice breaker is to talk about the weather. But in Dubai, since the weather rarely changes, it doesn’t provide for much conversation.  Because Dubai has a huge expat community with many different nationalities,  many conversations instead begin with, “So where are you from?”.

At first I thought people were genuinely interested to know more about me, but actually they just wanted to confirm the stereotype they already had based on my appearance. This conversation has almost become a daily ritual for me. It generally goes like this:

Random Person: So where are you from?
Me: American.
Random Person: (Clearly unsatisfied with my answer) No. Where are you from?
Me: Indian
Random Person: (Growing more agitated) No. You do not look like an Indian. Where are you from?
Me: Mexican
Random Person: (Not knowing what to say) OK.

There are a few slight variations that can occur:

1. Sometimes the “Random Person” is a South Asian person who has never left their native country before coming to Dubai, so they will just say “UK?” and the  “Where are you from?” is only implied. So for example, they will see me and just say, “UK?”. After a couple of minutes,  I will realize what they are talking about and go into my usual country list.

2. I can never tell  if “Random Person” is asking about my nationality or ethnicity, so I might  say “American” or “Indian” first, but whichever I say, they are still not satisfied with my answer.

3. If I am tired that day, I will just say “Mexican” in the beginning and then all conversation will cease as most people in this region don’t know too much about Mexico.

If you are wondering why I chose Mexico, it is not only because I can pass for Mexican if needed, but mostly, because I love the food. Growing up in California, I was surrounded by Mexican culture and food, so Mexican cuisine has many flavors and ingredients I enjoy to eat and cook. This black bean salad is inspired by the flavors of my adopted nationality.

Black Bean Salad Recipe:

Ingredients:

2-3 cups cooked black beans (canned and rinsed OK too)
1 large red onion, chopped
1 large red bell pepper, chopped
4 cloves garlic, chopped fine
1 cup corn, (thawed frozen corn OK)
1/2 cup green onion, chopped
1/2 cup coriander, chopped
1 tablespoon cumin
1 teaspoon olive oil
juice from 1/2 lemon
Cayenne, to taste
Salt, to taste
1 teaspoon diced jalapeno (optional)

Preparation:
1. Combine all ingredients in a large bowl and stir. Refrigerate for a couple of hours so all flavors come together. Serve chilled or at room temperature and garnish with more chopped green onion and coriander.

NOTE:  I prefer to put in refrigerator overnight as it tastes even better the next day. You can use this as a main dish or side salad or even as a filling in a taco or in a quesadilla – just add some cheese and melt inside a tortilla in a hot pan.

Baked Spinach, Feta, and Sundried Tomato Quinoa Cakes with Roasted Pepper Sauce

Sometimes it’s hard having a different opinion than the rest of the group. This is especially true in the food world. For example, try telling a chocoholic you don’t like chocolate and they will start to question your character.  What do you mean you don’t like chocolate? What kind of person are you??

Usually food preference is pretty subjective but some foods are so widely loved that expressing dislike towards them causes anger. I have somehow provoked outrage when I told people I didn’t like jello, or doughnuts, or scones, or even coffee. Sometimes I really want to like something because everyone else does, but my stubborn taste buds just won’t do it. Such was the case with quinoa.

It was initially just a food trend, but over the past few years quinoa has slowly become a food staple, and for a few years I have been trying to make it palatable. After every unsuccessful quinoa dish, I plan to never eat it again, but then I am bombarded with people raving about its’ great health benefits, and I find myself trying to cook it again.

This time I vowed not to listen to anyone anymore. But some voices you cannot ignore, such as the voices of your close family and friends. Every time I post anything about quinoa on facebook, it always gets more likes, more comments and more recipe requests than any other dish. So I decided to try quinoa one more time. My solution was to make a dish with enough additional ingredients to mask the quinoa “look” and a dipping sauce to mask the quinoa flavor. This scenario worked well for me as I get a nutritious meal with minimal quinoa flavor and my quinoa-hungry Khana Mama fans get a recipe with their apparently favorite ingredient.

Now if only I can find a way to make my kids eat it…

Baked Spinach, Feta, and Sundried Tomato Quinoa cakes with Roasted Red Pepper Sauce


Ingredients for Quinoa Cakes:
1 large egg
2 Tablespoons flour
2 Tablespoons tahini
1 1/2 teaspoons apple cider vinegar
2 cups cooked quinoa, cooked as per package instructions
1 cup cooked chickpeas (canned, rinsed chickpeas ok)
5 oz fresh baby spinach, sautéed and chopped with excess water squeezed out OR 1 cup frozen chopped spinach thawed with excess water squeezed out
1/4 cup chopped sun-dried tomatoes
¼ cup feta cheese
1 small finely chopped onion
4 Tablespoons chopped cilantro
3 cloves garlic, minced
1/4 teaspoon salt, to taste
1-2 tsp cumin to taste
Cayenne to taste

PREPARATION for Quinoa Cakes:
1. Preheat oven to 200C. Spray nonstick spray on cooking sheet.
2. If using fresh spinach, bring a large pot of water to a boil. Add spinach and cook until wilted. Drain in colandar and squeeze out excess water. When drained completely, chop.
OR
Defrost frozen chopped spinach and squeeze water out with paper towel.
3. Coarsely mash chickpeas in food processor. Add in sundried tomatoes, spinach, feta, garlic, onions, and coriander and mix in food processor until combined.
4. Combine egg, flour, tahini and vinegar in a bowl. Stir in COOKED quinoa and spices. Stir in remaining ingredients from food processor then mix (or mash) together until mixture is firm enough to shape in little patties.
5. Shape mixture into 1/4 cup patties and put on cookie sheet. Patties should not be too flat, and they will bake to the shape you leave them in.
6. Bake at 200C for 15 minutes then flip patties and bake another 10- 15 minutes or until brown and lightly crisp.
Serve with red pepper sauce.

INGREDIENTS For Roasted Pepper Sauce:

3-4 peeled roasted bell peppers NOTE: I like to use a combo of red, orange and yellow. (Peppers from a jar ok or you can roast them yourself: Just put them on baking sheet for 30-40 mins at 225C, remove from oven and cover with foil until cooled, then peel and throw away seeds)
1/4 cup toasted pine nuts
1-2 cloves garlic, grated
2 teaspoon apple cider vinegar
Salt, to taste
Cayenne, if desired

PREPARATION For Roasted Red Pepper Sauce:
1. Puree all ingredients listed for sauce in a food processor.
If you have extra sauce, it is great on burgers, quesadillas, crackers, or really anything!