NYC Style Street Cart Chicken and Rice Recipe

New York City is the city that never sleeps, and luckily for me, is the city that never stops eating. No matter who you are, or what you want, you can definitely find it in NYC.  I remember randomly going through a shrimp cocktail phase. I loved the fact that I could come home after a night out,  order it from our neighborhood diner, and have it promptly delivered in the middle of the night. No questions asked.

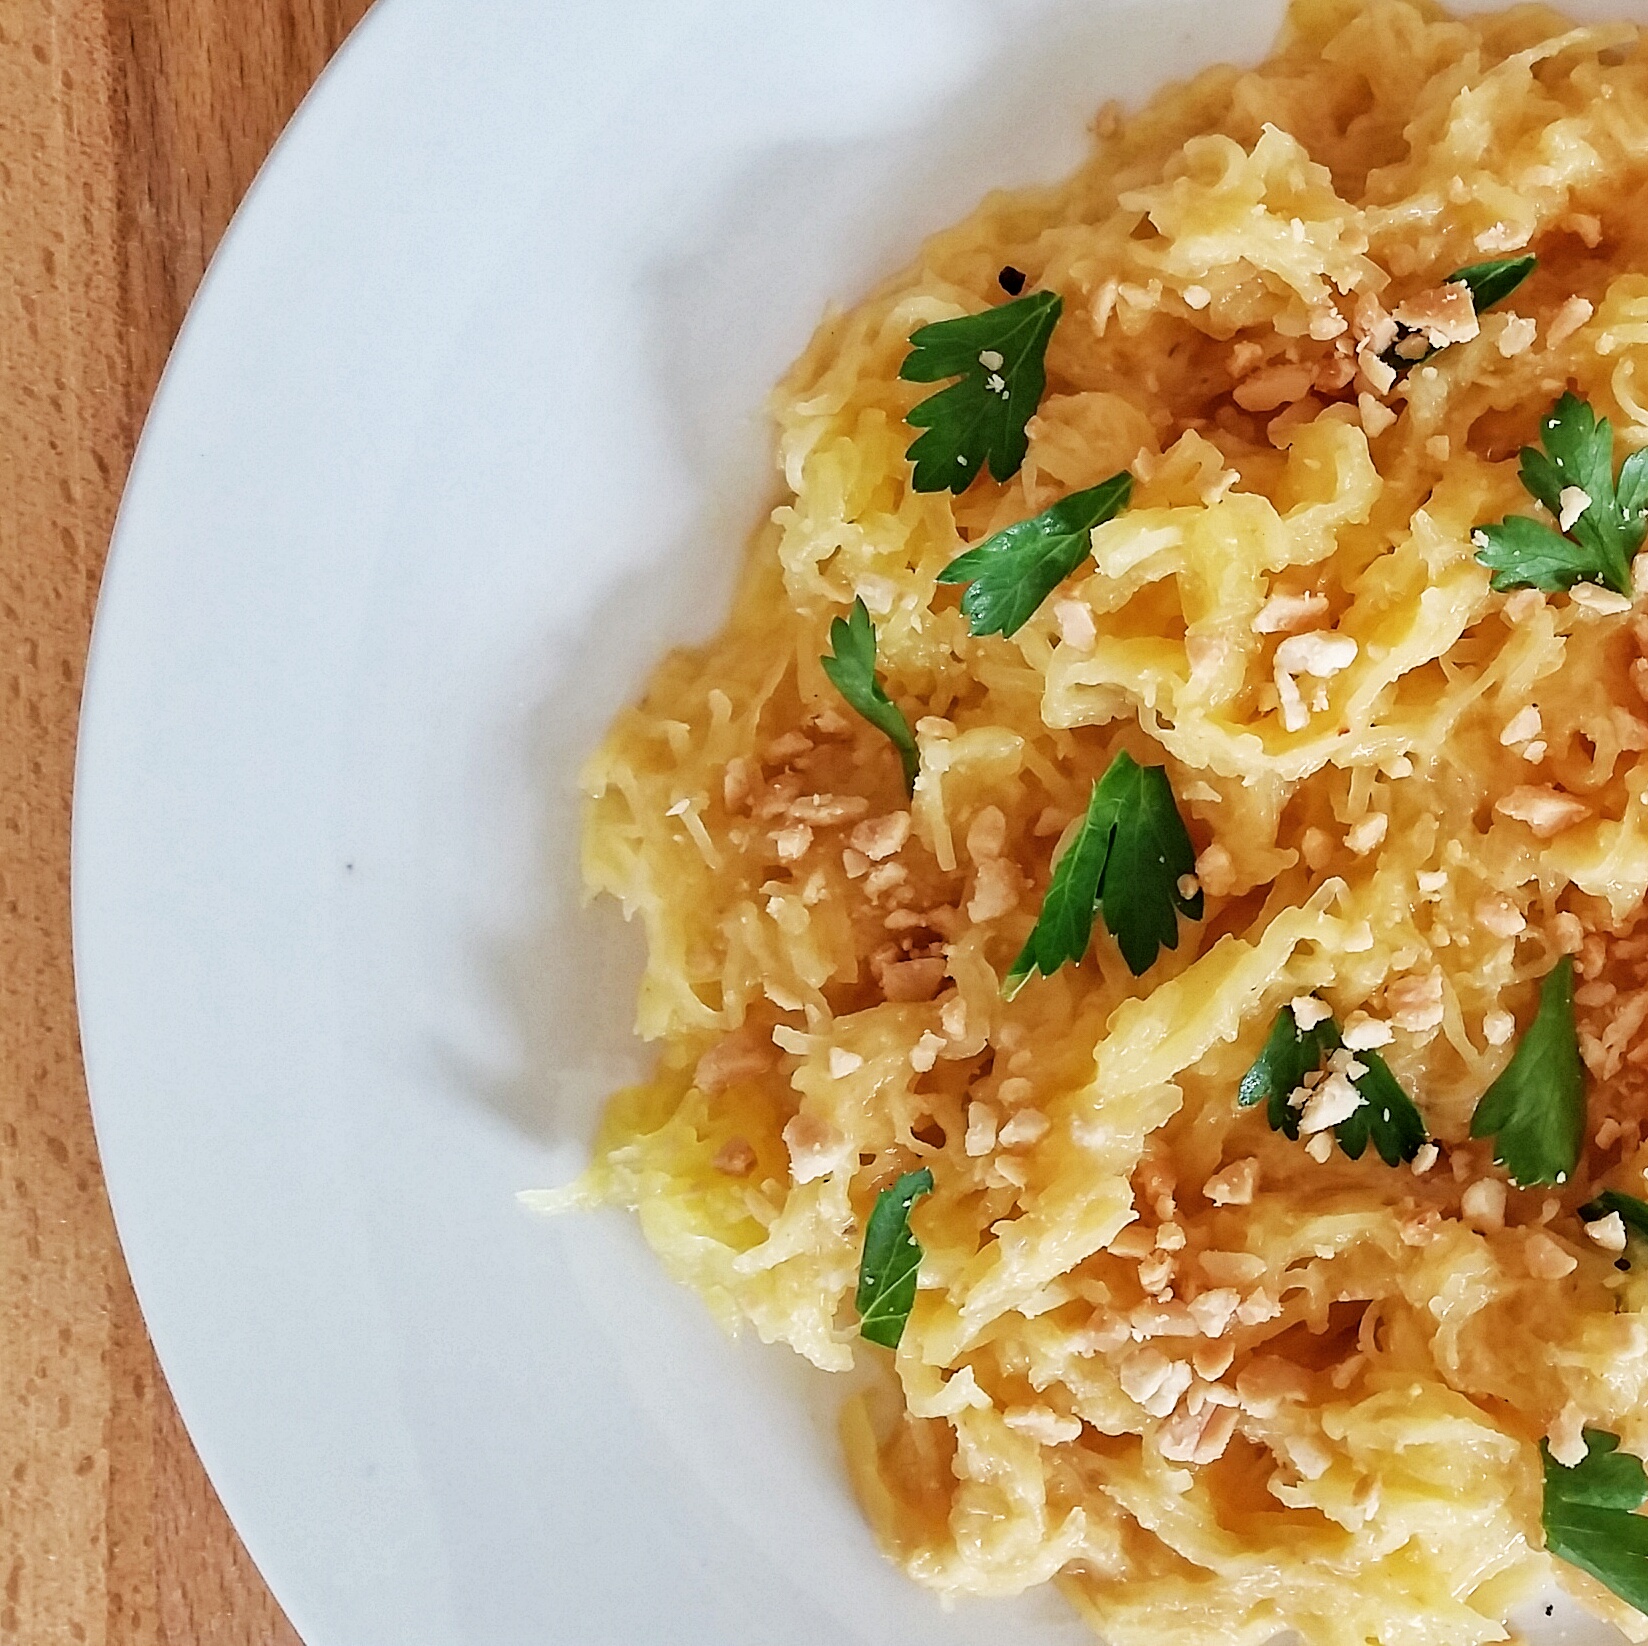
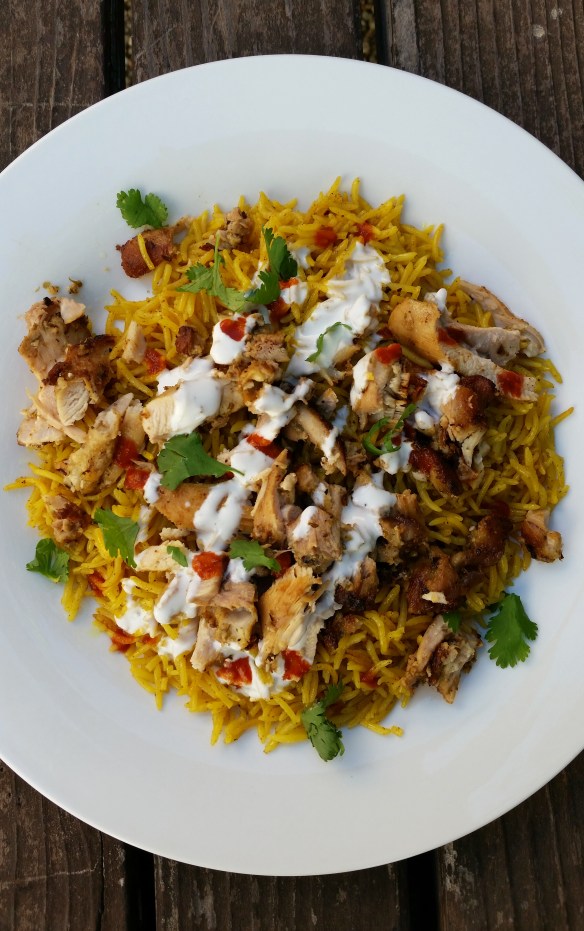
We always had our “go to” places for our after-hours cravings. Some of our faves were our favorite Margarita slice in the East Village, or falafels from Mamoun’s, but the meal that always hit the spot was the halal street cart chicken and rice. Warm buttery rice with grilled spicy chicken and the famous white sauce doused on top, accompanied by an unassuming iceberg lettuce salad on the side, was the perfect end to a perfect night.

After moving across the country, I did manage to find the street cart chicken in downtown San Francisco, and we also got the Halal Guys in the bay area (yay!). Ironically it wasn’t difficult to find my chicken and rice dish, but the most elusive element was finding the time to go! Luckily I found this recipe that inspired me to make my own version at home. Remember, similar to how each cart has their own flavor and personalization of their spice mix to their dish, feel free to adjust the spices to your own taste!

20160602_181907-01

NYC Style Street Cart Chicken and Rice Recipe

Ingredients:

For the chicken:

  • 2 tablespoons lemon juice
  • 1 tablespoon chopped fresh oregano or 2 tablespoon dried oregano
  • 1- 1.5 tablespoon ground coriander
  • 6 garlic cloves, roughly chopped (about 3 tablespoons)
  • 1/4 cup light olive oil
  • Kosher salt and freshly ground black pepper
  • 2 pounds boneless, skinless chicken thighs, trimmed of excess fat (6 to 8 thighs)
  • 1 tablespoon vegetable or canola oil (for frying)

For the rice:

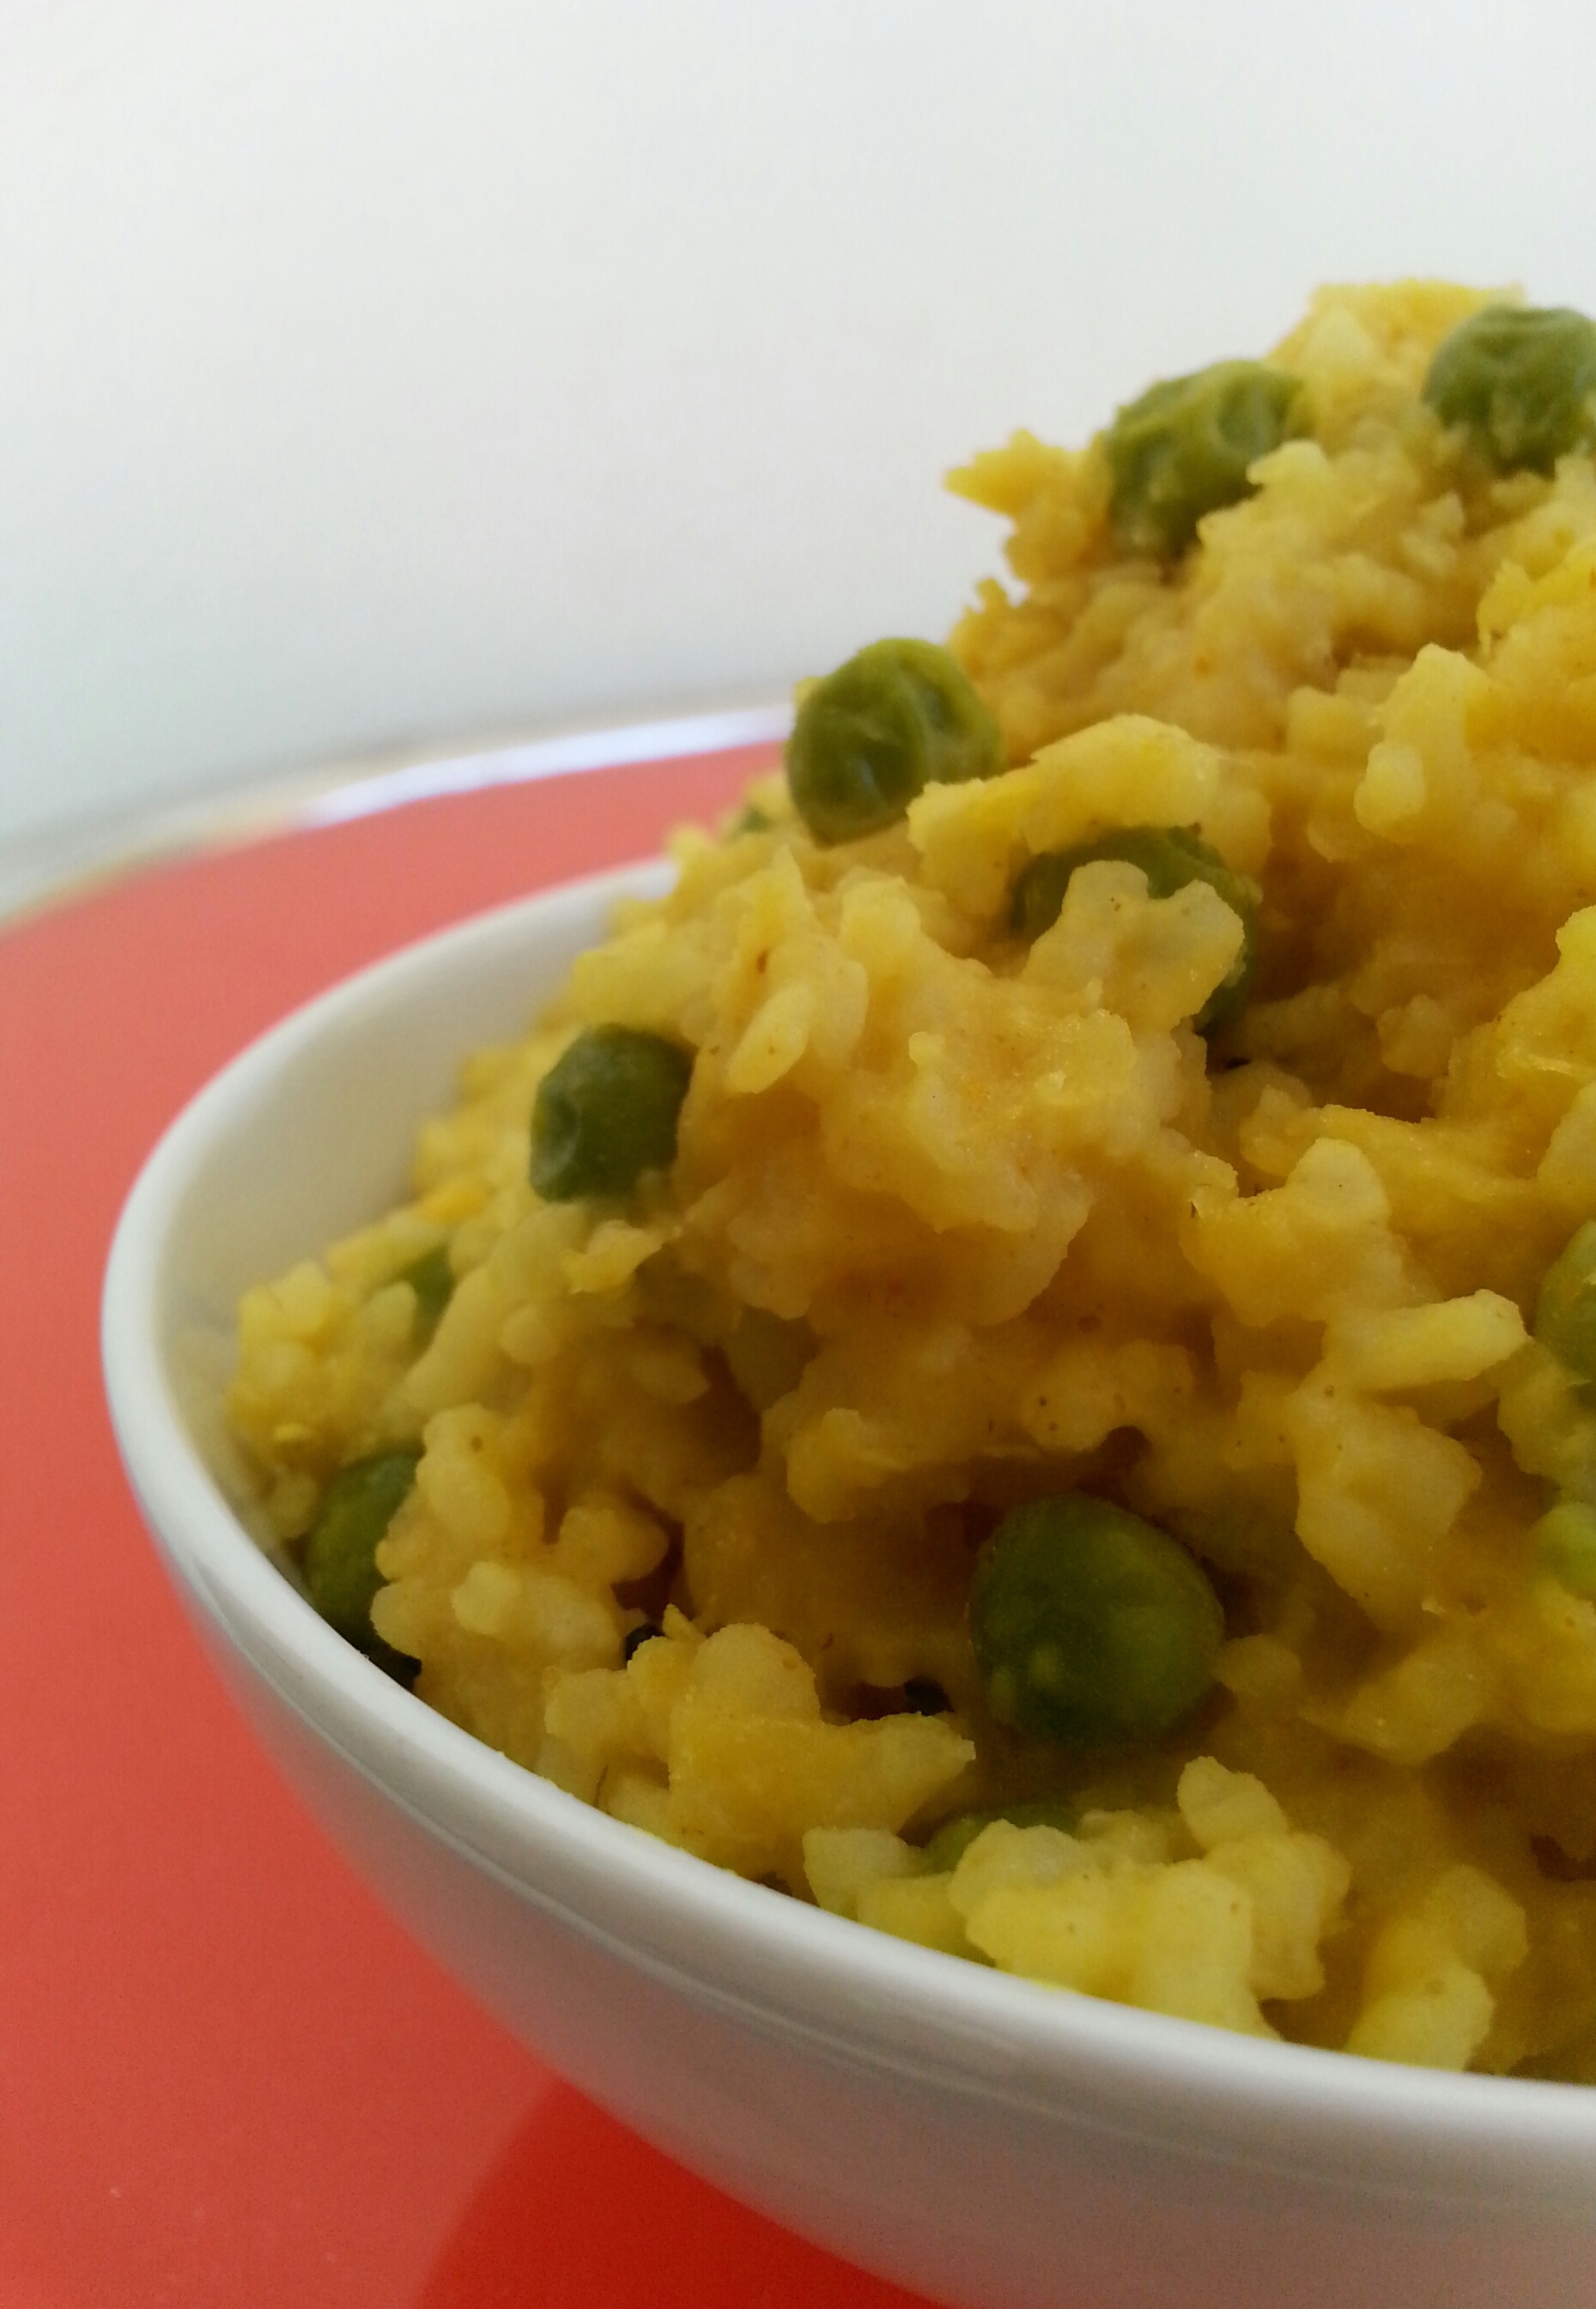
  • 2 tablespoons unsalted butter
  • 1 teaspoon turmeric
  • 1 1/2 teaspoon ground cumin
  • 1 1/2 cups Basmati rice
  • 2 1/2 cups water or chicken broth
  • Kosher salt and freshly ground black pepper

For the sauce:

  • 1/2 cup mayonnaise (or less)
  • 1/2 cup Greek yogurt
  • 1/2  teaspoon sugar
  • 2 tablespoons white vinegar
  • 1 teaspoon lemon juice
  • Kosher salt and freshly ground black pepper

To serve (optional):

  • 1 head iceberg lettuce, shredded
  • 1 large tomato, cut into wedges
  • Fluffy pocketless pita bread, brushed in butter, lightly toasted, and cut into 1 × 3-inch strips
  • Harissa-style hot sauce
  • chopped fresh cilantro (optional)

Method:

1.  Marinate the chicken: Combine the lemon juice, oregano, coriander, garlic, and olive oil in a blender. Blend until smooth. Season the marinade to taste with kosher salt and black pepper. Season the chicken with salt and pepper. Place the chicken and marinade in a bowl and mix, making sure chicken is coated.  Marinate the chicken in the refrigerator for at least 1 hour and up to 4 hours.

2. Preheat oven to 400 degrees F. Heat the oil in a 12-inch heavy-bottomed cast iron or stainless-steel skillet over medium-high heat until it is lightly smoking. Add the chicken pieces and cook without disturbing until they are lightly browned, about 3-4 minutes per side.  Transfer the chicken to a casserole dish. Cover and cook in oven for 15 minutes. After 15 minutes, take out and put on counter to cool, keeping lid on.

3. Make the rice:  Melt the butter over medium heat in a large Dutch oven. Add the turmeric and cumin and cook until fragrant but not browned, about 1 minute. Add the rice and stir to coat. Cook, stirring frequently, until the rice is lightly toasted, about 4 minutes. Add the water (or chicken broth if using). Season to taste with salt and pepper. Raise the heat to high and bring to a boil. Cover, reduce to a simmer, and cook for 15 minutes without disturbing. Remove from the heat and allow to rest until the water is completely absorbed and the rice is tender, about 15 minutes.

4. While rice and chicken are cooking, make the sauce. In a small bowl, combine the mayonnaise, yogurt, sugar, vinegar, lemon juice, and black pepper. Whisk to combine. Season to taste with salt. Set aside.

5. To serve: Place chicken on cutting board and cut into small pieces. Take rice and arrange on plate. Top with chicken, white sauce, hot sauce, and chopped cilantro (if desired).  Serve with  chopped iceberg lettuce, tomatoes, and pita on the side if desired.

Enjoy!

Pantry Diva Logo1

Advertisement

Easy Homemade Almond Milk

20160603_075333-01

As much as I love dairy, in the back of my mind I knew I had to let it go. The immense joy from consuming some of my favorite foods like towering ice cream sundaes, melty baked brie, and creamy lattes was becoming shorter and shorter lived. (Not to mention my clothes were becoming tighter and tighter!)

I decided to take some action on improving my diet and a friend told me about the Whole30 which encourages eating non-processed food and bans many foods that cause inflammation. One of the things it tells you to give up is dairy. I figured the milk in my daily lattes was the main culprit and decided to switch it out. But I couldn’t stomach drinking black coffee though. I wasn’t a fan of coconut, soy, or rice milk, but was delighted to find out I loved almond milk. But then the Whole30 bans carrageenan (which is a plant extract food companies use as a thickening agent) which was of course included in the only brand of almond milk I liked.

I decided if I am embracing non-processed foods, I might as well try making it myself. Most homemade almond milk recipes used phrases like “soak overnight” or “peel 1 cup of almonds” and other work intensive words that a busy mama does not have time for. Instead, I found an easy shortcut version using just a few ingredients. And the best part is not only does it save you money, but it tastes better than packaged almond milk too. You will love it!

20160603_073709-01

All you need to make delicious almond milk – dates, almond butter, and vanilla extract. Just add water!

Easy Homemade Almond Milk Recipe 

20160603_075228-01

I have just blended this – so it is still frothy and you can see the little grainy bits. They will soon settle to the bottom. You can strain them with a nut milk bag if you wish.

Ingredients:

1 1/2 Tablespoon Almond Butter (I grind my own but you can use store bought as well)

2 Pitted Dates

1/2- 1 Teaspoon Vanilla Extract

4 Cups Water

Method:

1. Place all ingredients in blender (I used my Vitamix) and blend. (usually 30 seconds or so – it will be all frothy or milky.

2. Chill in fridge and enjoy. (There are some grainy bits from the dates, so you can strain it with a nut milk bag if you want, but it is sooo small and settles to the bottom so that it does not bother me. Plus extra fiber!) Almond milk keeps in fridge for 3 days or so.

Spaghetti Squash “Pad Thai”

20141205_130731_1

I am not a cold weather person. I love sun and warmth and frolicking on warm sandy beaches. But now it is winter. Initially I was shivering under my down comforter waiting for the sun to come back, but slowly I have come to appreciate certain things about the cold season. I love feeling the crunch of leaves under my new boots while walking on the sidewalk, the sound of crackling sparks from the logs in the fireplace, and curating my ever expanding winter wardrobe of gorgeous scarves and coats and sweaters. But most of all, I love to eat all the “comfort food” that makes me feel warm and fuzzy inside.

Things like hot chocolate with melty marshmallows, hearty meaty stews, creamy soups in flaky bread bowls, and any big bowl of pasta with plenty of sauce. Unfortunately every food I am craving is a giant carbohydrate overload. I am living in paleo, gluten free, vegan, low-carb California, and eating all the typical comfort food is often looked upon with judgement from my fellow health conscious Californians. Luckily there are alternatives. Instead of eating spaghetti and meatballs, I can use spaghetti squash for the pasta which several of my paleo friends have been advocating for some time now. To be honest, it does look like spaghetti and meatballs, but it definitely does not taste like it. My comfort food seeking side was not too happy with this substitution. I just couldn’t mess with a classic.

But actually,  my paleo peeps were on to something. I like the idea of substituting the spaghetti squash for noodles: Low-carb and an additional serving of vegetables (win-win!).  I needed another option besides a tomato based sauce, and found a recipe with a peanut sauce and Asian flavors similar to Pad Thai.  I also loved the crunch of the crushed peanuts and the option to add any other vegetables such as chopped red peppers or vegetable sprouts. In fact, I liked this dish so much that I am considering buying a spiralizer to make noodles out of zucchini. But will be saving that for another winter day though…

Spaghetti Squash “Pad Thai” Recipe

20141205_130612_1

INGREDIENTS

For Squash:

  • 2 medium spaghetti squash
  • olive oil
  • salt/pepper
  • 1 teaspoon minced garlic
  • ¼ cup chopped parsley or cilantro
  • ¼ cup crushed peanuts **Note: Blend in food processor. Do not leave this ingredient out, it adds nice crunch and texture

For Peanut Sauce:

  • 1 can (14 ounces) coconut milk
  • ⅔ cup natural, unsweetened peanut butter **Note: You could probably use regular peanut butter, but if you do, omit the sugar/agave
  • ¼ cup sugar or agave
  • ¼ cup water
  • 2 tablespoons soy sauce
  • 2 tablespoons white or apple cider vinegar
  • 2 teaspoons sesame oil
  • 2 teaspoons red curry paste
  • 1 teaspoon Sri Racha chili sauce (optional)

METHOD:

1. Preheat oven to 350 F. Half the squash and scoop out the seeds.

2. Drizzle inside with olive oil and sprinkle with salt and pepper. Place spaghetti squash cut side down on a baking sheet lined with foil and roast for 45 minutes or until soft.

3. Remove squash from oven and let cool for 10 minutes. Take fork and scoop out the squash. It should come out in little strands that look like noodles. Set aside.

4. While squash is roasting, place all sauce ingredients in a medium saucepan and bring to a boil over medium-high heat. Then turn down to low and simmer for 5 minutes while stirring almost constantly.

5. After sauce thickens a bit, take off heat and set aside. (I liked mine on the thicker side so let it cook for awhile longer).

6. Heat a skillet over medium heat and add olive oil.  Add minced garlic, and cook for a minute. Add spaghetti squash, ½ -¾ cup of the peanut sauce pan, chopped cilantro, crushed peanuts. and combine. Stir to combine and cook until heated through (about 2 minutes).

7. Plate and garnish with a little more crushed peanuts and chopped cilantro. Can also add some bean sprouts or other vegetables if desired. Add more sauce if needed. Serve immediately.

Yield: 3-4 servings as main (5-6 as a side)

Based on this recipe from Leelalicious.

Vegetable Khichidi Recipe

I have a confession to make. I call myself the Pantry Diva but there are times when even my pantry is bare. We were on vacation this past week and were eating out often, and I did not do my usual grocery shopping. Of course my lack of meal planning had no impact on my family’s incessant daily hunger pangs. One evening, we just returned from the beach and everyone was starving. I needed to make something fast and with literally no ingredients on hand. I decided to make khichidi, which is a one pot meal of rice and daal and vegetables and spices.

Image

I use basmati rice and masoor daal for my khichidi

You can throw any veggies or spices you have on hand, but usually less is more as it is a simple dish and you don’t want to have too many flavors competing with each other. So, while everyone showered I soaked the daal and rice (as I am too paranoid to buy a pressure cooker) and then quickly cooked the khichidi. I usually rate any dish’s success not by its taste or ease of cooking but instead by if my kids eat it or not…and they devoured it! (OK they were starving but hey I take any cooking successes I can get!)

As everyone was scarfing down my khichidi, I was putting all the spices back in my cupboard and I noticed one in particular: Hing.

Image

Hing (Asafoetida) can be bought in Indian grocery stores.

Hing? Although I have been using it for years, I realized I didn’t know much about it. I wondered what exactly is this strange spice and why does it make the khichidi taste so good? After some googling I found out Hing (Asafoetida in English) is a dried and ground resin extracted from a plant. Based on its unpleasant smell in its natural form, hing has been called such names as “Devil’s Dung” or “stinking gum”. This initial information was not encouraging me to find out more about hing. But I kept reading, and it got better: We usually buy hing from the supermarket in its commercial form not fresh form, so the flavor and smell is much more mild. It adds a savory flavor to the food similar to sautéed onion and garlic. In addition to being a flavor enhancer, it also has some health benefits such as aiding digestion and reducing gas. You can find more information about Hing here and here.

Image

Because the khichidi recipe is so versatile, you can add any combination of veggies and spices. I have made it both with and without hing and trust me, you need it. Although it has a subtle flavor, hing is the one spice that is essential in a tasty khichidi. You don’t notice it when it’s there, but you definitely miss it when it’s gone. And remember, a little hing goes a long way…you don’t need to use much. You can find it in any Indian grocery store if your local supermarket doesn’t have it. Apparently it is used in many other Indian dishes too so feel free to experiment. Add Hing (Asafoetida) into your pantry today!

Pantry Diva Tip: This khichidi recipe required grated fresh ginger, and I had no time to go shopping. Store your fresh ginger in the freezer, it keeps for a really long time. When a recipe calls for fresh ginger, just take it out of the freezer, grate what you need, and put it back in. No need to run to the store each time you need ginger!

Vegetable Khichidi Recipe

Image

INGREDIENTS:

1 Cup Basmati Rice

½ Cup Masoor Daal

2-3 cups water 

NOTE: I tend to add more water (about 3 cups water) as I like the khichdi texture kind of “goopy”and stuck together, not like separate grains of rice. Feel free to reduce amount of water. But, if you have NOT presoaked the rice and daal, you can add more water and increase cooking time.

2 teaspoons cooking oil

1 onion, chopped fine

1 teaspoon ginger, grated

1 bunch coriander, chopped (optional for garnish)

1 teaspoon Hing (Asafoetida)

1 teaspoon cumin seeds

½ teaspoon mustard seeds (optional)

½ teaspoon turmeric

Red chili powder,to taste

Salt, to taste

¾ cup peas (frozen ok)

Yoghurt (optional – to serve with khichidi)

NOTE: My recipe above is just a guide. You can add any vegetables you have on hand such as grated carrots, cauliflower, broccoli, peas, etc. You can also add different spices, such as coriander powder, cumin powder, garam masala, black pepper, ginger, garlic. Just remember that this is a simple dish and you don’t want too many flavors competing with each other. Less is more!

PREPARATION:

1. Wash rice and daal and soak for 20 minutes. Note: You do not need to soak beforehand but then you must increase water and cooking time.

2.  Heat oil in a pot, and when hot add the cumin seeds, mustard seeds and hing and stir for a minute.

3. Add chopped onion and stir until very light brown.

4. Add ginger, chili powder, turmeric, and salt and sauté for a few minutes.

5. Add drained rice and daal and mix.

6. Add water and peas and any additional vegetables. Heat until boils.

7. Cover pot and and cook on low heat until rice is done. It is usually done when there are little holes on top of the rice and the water has evaporated.

8. If desired, garnish with chopped coriander and serve with yoghurt or raita.

Black Bean Salad

In most countries, when you meet someone for the first time, a good ice breaker is to talk about the weather. But in Dubai, since the weather rarely changes, it doesn’t provide for much conversation.  Because Dubai has a huge expat community with many different nationalities,  many conversations instead begin with, “So where are you from?”.

At first I thought people were genuinely interested to know more about me, but actually they just wanted to confirm the stereotype they already had based on my appearance. This conversation has almost become a daily ritual for me. It generally goes like this:

Random Person: So where are you from?
Me: American.
Random Person: (Clearly unsatisfied with my answer) No. Where are you from?
Me: Indian
Random Person: (Growing more agitated) No. You do not look like an Indian. Where are you from?
Me: Mexican
Random Person: (Not knowing what to say) OK.

There are a few slight variations that can occur:

1. Sometimes the “Random Person” is a South Asian person who has never left their native country before coming to Dubai, so they will just say “UK?” and the  “Where are you from?” is only implied. So for example, they will see me and just say, “UK?”. After a couple of minutes,  I will realize what they are talking about and go into my usual country list.

2. I can never tell  if “Random Person” is asking about my nationality or ethnicity, so I might  say “American” or “Indian” first, but whichever I say, they are still not satisfied with my answer.

3. If I am tired that day, I will just say “Mexican” in the beginning and then all conversation will cease as most people in this region don’t know too much about Mexico.

If you are wondering why I chose Mexico, it is not only because I can pass for Mexican if needed, but mostly, because I love the food. Growing up in California, I was surrounded by Mexican culture and food, so Mexican cuisine has many flavors and ingredients I enjoy to eat and cook. This black bean salad is inspired by the flavors of my adopted nationality.

Black Bean Salad Recipe:

Ingredients:

2-3 cups cooked black beans (canned and rinsed OK too)
1 large red onion, chopped
1 large red bell pepper, chopped
4 cloves garlic, chopped fine
1 cup corn, (thawed frozen corn OK)
1/2 cup green onion, chopped
1/2 cup coriander, chopped
1 tablespoon cumin
1 teaspoon olive oil
juice from 1/2 lemon
Cayenne, to taste
Salt, to taste
1 teaspoon diced jalapeno (optional)

Preparation:
1. Combine all ingredients in a large bowl and stir. Refrigerate for a couple of hours so all flavors come together. Serve chilled or at room temperature and garnish with more chopped green onion and coriander.

NOTE:  I prefer to put in refrigerator overnight as it tastes even better the next day. You can use this as a main dish or side salad or even as a filling in a taco or in a quesadilla – just add some cheese and melt inside a tortilla in a hot pan.

Spiced Roasted Chicken with Garbanzo Beans and Cherry Tomatoes with Yoghurt Sauce

Have you ever noticed how certain things can trigger different emotions? Maybe you have an outfit that makes you feel amazing so you can walk into a meeting with confidence and authority. Or perhaps you hear an old song on the radio and it brings back fond memories of your first school dance. For me, all my emotions revolve around food. If I’m happy, I eat, if I’m sad, I eat. Even if I’m happy for someone, I make something and go eat with them.  

I have a recipe that brings me utter joy, and a recipe everyone will thank me for. It is a recipe that will save you on a weekday when you don’t have time to cook. It is a recipe that you can cook and take to a potluck or bring to a friend. It is a recipe that the whole family will enjoy.  It is delicious, nutritious and has minimal preparation and cook time. I will not say much more about this recipe but will only relay my emotions about it:  I feel  love that I have found it, joy when eating it, and now happiness that I can pass it along.

Spiced Roasted Chicken with Garbanzo Beans and Cherry Tomatoes with Yoghurt Sauce


Inspired by a recipe from Epicurious

INGREDIENTS:
3-4 Tablespoons extra-virgin olive oil
4 garlic cloves, minced
1 tablespoon smoked paprika
1-2 teaspoon ground cumin
cayenne powder to taste
½-1 teaspoon salt
1/2 cup lowfat plain yogurt or Greek yogurt
4 chicken breast halves with bones or 12 drumsticks (I like to use drumsticks because easier for kids to grab and eat)
1 15-ounce can garbanzo beans (chickpeas), drained and rinsed
1 12-ounce container cherry tomatoes
1 cup chopped fresh coriander, divided
Cous Cous, Rice, or Pita to serve with, if desired

PREPARATION:
1. Preheat oven to 450°. Put olive oil, garlic, cumin, paprika, cayenne and salt in large bowl and mix. Place chicken inside bowl and mix so it is covered with the mixture. Take out spice covered chicken and place in  roasting tray.
2. Pour chickpeas in same large bowl chicken was in. Put ½ cup coriander in as well and mix around. There should still be a bit of spice inside the bowl to coat the chickpeas. Pour the chickpeas over the chicken in the roasting pan.
3. Put the tomatoes on the chicken and chickpeas in the roasting pan and put in oven at 450F for 30 minutes or until done.
4. While chicken is in oven, put yoghurt in a small bowl and add a ½ – 1 teaspoon of cumin, and cayenne and salt to taste. Add water to thin yogurt to desired consistency. Set aside.
5. If desired, make rice or cous cous or salad to serve with chicken.
6. Take chicken out of oven when done, and sprinkle with remaining coriander. Serve with rice or cous cous or pita and yogurt sauce.

Baked Spinach, Feta, and Sundried Tomato Quinoa Cakes with Roasted Pepper Sauce

Sometimes it’s hard having a different opinion than the rest of the group. This is especially true in the food world. For example, try telling a chocoholic you don’t like chocolate and they will start to question your character.  What do you mean you don’t like chocolate? What kind of person are you??

Usually food preference is pretty subjective but some foods are so widely loved that expressing dislike towards them causes anger. I have somehow provoked outrage when I told people I didn’t like jello, or doughnuts, or scones, or even coffee. Sometimes I really want to like something because everyone else does, but my stubborn taste buds just won’t do it. Such was the case with quinoa.

It was initially just a food trend, but over the past few years quinoa has slowly become a food staple, and for a few years I have been trying to make it palatable. After every unsuccessful quinoa dish, I plan to never eat it again, but then I am bombarded with people raving about its’ great health benefits, and I find myself trying to cook it again.

This time I vowed not to listen to anyone anymore. But some voices you cannot ignore, such as the voices of your close family and friends. Every time I post anything about quinoa on facebook, it always gets more likes, more comments and more recipe requests than any other dish. So I decided to try quinoa one more time. My solution was to make a dish with enough additional ingredients to mask the quinoa “look” and a dipping sauce to mask the quinoa flavor. This scenario worked well for me as I get a nutritious meal with minimal quinoa flavor and my quinoa-hungry Khana Mama fans get a recipe with their apparently favorite ingredient.

Now if only I can find a way to make my kids eat it…

Baked Spinach, Feta, and Sundried Tomato Quinoa cakes with Roasted Red Pepper Sauce


Ingredients for Quinoa Cakes:
1 large egg
2 Tablespoons flour
2 Tablespoons tahini
1 1/2 teaspoons apple cider vinegar
2 cups cooked quinoa, cooked as per package instructions
1 cup cooked chickpeas (canned, rinsed chickpeas ok)
5 oz fresh baby spinach, sautéed and chopped with excess water squeezed out OR 1 cup frozen chopped spinach thawed with excess water squeezed out
1/4 cup chopped sun-dried tomatoes
¼ cup feta cheese
1 small finely chopped onion
4 Tablespoons chopped cilantro
3 cloves garlic, minced
1/4 teaspoon salt, to taste
1-2 tsp cumin to taste
Cayenne to taste

PREPARATION for Quinoa Cakes:
1. Preheat oven to 200C. Spray nonstick spray on cooking sheet.
2. If using fresh spinach, bring a large pot of water to a boil. Add spinach and cook until wilted. Drain in colandar and squeeze out excess water. When drained completely, chop.
OR
Defrost frozen chopped spinach and squeeze water out with paper towel.
3. Coarsely mash chickpeas in food processor. Add in sundried tomatoes, spinach, feta, garlic, onions, and coriander and mix in food processor until combined.
4. Combine egg, flour, tahini and vinegar in a bowl. Stir in COOKED quinoa and spices. Stir in remaining ingredients from food processor then mix (or mash) together until mixture is firm enough to shape in little patties.
5. Shape mixture into 1/4 cup patties and put on cookie sheet. Patties should not be too flat, and they will bake to the shape you leave them in.
6. Bake at 200C for 15 minutes then flip patties and bake another 10- 15 minutes or until brown and lightly crisp.
Serve with red pepper sauce.

INGREDIENTS For Roasted Pepper Sauce:

3-4 peeled roasted bell peppers NOTE: I like to use a combo of red, orange and yellow. (Peppers from a jar ok or you can roast them yourself: Just put them on baking sheet for 30-40 mins at 225C, remove from oven and cover with foil until cooled, then peel and throw away seeds)
1/4 cup toasted pine nuts
1-2 cloves garlic, grated
2 teaspoon apple cider vinegar
Salt, to taste
Cayenne, if desired

PREPARATION For Roasted Red Pepper Sauce:
1. Puree all ingredients listed for sauce in a food processor.
If you have extra sauce, it is great on burgers, quesadillas, crackers, or really anything!

Masoor for my Monsieur – Masoor Daal Recipe

A miracle happened today that brought me out of my blogging hiatus. My eternally picky husband who only likes his mother’s cooking complimented my masoor daal! His exact words: “Wow, this tastes just like back home, maybe even better.” I just stared at him in disbelief for a few seconds. After the initial shock wore off, I ran to the computer to instantly document this moment so it would be immortalized forever. My husband has always been my biggest food critic, particularly for desi food, so this was a huge personal achievement.

Indian food had always been a culinary obstacle for me. I guess I never learned how to make it since my mom was an amazing cook and it was always perfect and readily available.  Also I somehow wasn’t interested to learn about turmeric and cardamom with the same zest I wanted to learn about oregano and rosemary which seemed so much more exotic. So I ended up learning to make many international cuisines, but not my own Indian one. But then I met my biggest food critic who only enjoyed eating the one cuisine I couldn’t make!  He was not impressed with my existing culinary arsenal, and I resolved to one day win him over.

After many foodie battles and take-out dinners, I somehow ended up marrying my food adversary. Strangely enough, some well meaning Auntie gave me an Indian cookbook for a wedding present, and it was from that book that I tried making Indian food for the first time. I just followed the recipes blindly and they kept coming out flat. And my personal food critic was always there to point out the flaws.

Looking back, I now realize my weakness was my inability to understand the common Indian spices and how each spice enhanced or affected the taste of the dish. If I wanted to fix the flavor of my dish, whether I needed to add coriander powder, or cut down on the cumin were a mystery to me.  I also realized my ignorance was partly due to my lack of any previous guidance making any desi dishes. In many Indian kitchens (including my home), there is a round metal container, with smaller round containers inside for each individual spice. Whenever a meal is to be made, the matriarch of the family will take out this container and to the untrained eye, just haphazardly throw all the necessary spices into the dish, and before you know it, the dish is done and seasoned beautifully. No matter how many times you observe this phenomenon, you will never learn to cook Indian food this way! Trust me I have tried.

But then I practiced. After a lot of trial and error, I’ve learned quite a bit, and on my way to becoming the lady with my own round metal spice container. But the best measure of my success with Indian food is that my food critic finally gave a glowing review.

Masoor Daal


INGREDIENTS for Daal:
1 cup Masoor Daal , soaked in water for a couple hours.
*If you do not soak daal first, cooking time will be significantly longer, unless you use a pressure cooker to cook daal. My method is for stovetop only.
1 teaspoon turmeric
½ teaspoon red chili powder
½ teaspoon salt
1 tablespoon garlic, grated
1 teaspoon tamarind (imlee) paste – Can be found in most supermarkets or Indian grocers. I used Priya brand

INGREDIENTS For Tadka to add in daal:
1-2 tablespoon vegetable oil
1 onion, chopped
1 teaspoon cumin seeds
1 teaspoon ginger, grated
1-2 green chilis
1 cup cilantro, chopped

PREPARATION:
1. Add soaked daal and turmeric, chili, salt, and garlic in a pot with 5 cups water and bring to boil.
2. After boils, partly cover and lower heat and cook until soft.  Add additional water as necessary.
3. When done, mash or blend to desired consistency, (My hubby likes it quite blended) and add tamarind paste until fully incorporated. Set pot aside.
4. Heat oil in separate pan. Add onion and lightly brown. Add cumin seeds, ginger, green chilis and coriander.
5. Fry all together and add to hot daal. Mix.

Serves 2 generously. Serve with basmati rice.

Broccoli and Tofu Stir Fry

I was doing so well. These past months have been spent eating (relatively) healthily and exercising (Zumba!) pretty regularly. 

But then it happened. The holiday season started. And with each holiday came one calorie filled delicacy after the next. First came Diwali. By the light of the little diyas, I happily ate one mitai after the next, only pausing for a savory chakli break, and then resuming on the gulab jamun.

Then came Halloween. I actually tried not buying any candy this time. I even made Ry take a healthy dish of hummus and veggies for his school Halloween party. But despite my self control, the candy and chocolate flowed into my home from various parties and events and friends. And I am ashamed to admit, when the kids went to bed after trick or treating, I raided their candy bags to my heart’s content.

Now it is almost Eid, and my dear hubby has already bought some chocolate and sweets to celebrate. With Thanksgiving and Christmas just around the corner, it is unlikely I can control the glutton within.

So even though chocolate and cupcakes are on my mind, I am instead going to post a super healthy and tasty recipe I found on EatingWell to help me get back on track. I just started fitting into some of my old pre-pregnancy jeans and as comfortable as they were, I am not going back to the elastic waistbands of maternity wear!

Broccoli and Tofu Stir Fry with Brown Basmati Rice


INGREDIENTS:

1/2 cup vegetable or chicken broth (I usually steam my frozen broccoli beforehand, so just reserve some of that water)
1/4 cup dry sherry (see Note) or rice wine or few teaspoons of rice vinegar (non-alcoholic version)
3 tablespoons reduced-sodium soy sauce
3 tablespoons cornstarch, divided
2 tablespoons plus 1 teaspoon sugar
1/4 teaspoon crushed red pepper, or more to taste
1 14-ounce package extra-firm water-packed tofu, drained
1/4 teaspoon salt
2 tablespoons canola oil, divided
1 tablespoon minced garlic
1 tablespoon minced fresh ginger
6 cups broccoli florets (frozen ok too, just cook beforehand)
3 tablespoons water
·          Tilda Brown Basmati rice , cooked

PREPARATION:

1. Combine broth, sherry (or rice wine), soy sauce, 1 tablespoon cornstarch, sugar and crushed red pepper in a small bowl. Set aside.
2. Cut tofu into 3/4-inch cubes and pat dry, then sprinkle with salt. Place the remaining 2 tablespoons cornstarch in a large bowl. Add the tofu; toss gently to coat. Heat 1 tablespoon oil in a large nonstick skillet or wok over medium-high heat. Add the tofu; cook, undisturbed, until browned, about 3 minutes. Gently turn and cook, stirring occasionally, until browned all over, 2 to 3 minutes more. Transfer to a plate.
My tofu is somehow never crisp, but still a bit soggy, although it is hard enough to not break apart. Any tips on getting a nicer crust on my tofu would be much appreciated.
3. Reduce heat to medium. Add the remaining 1 tablespoon oil, garlic and ginger, few chili flakes; cook until fragrant, about 30 seconds. Add broccoli (and water  if fresh broccoli); cover and cook, stirring once or twice, until tender-crisp, 2 to 4 minutes. Stir the reserved broth mixture and add to the pan. Cook until the sauce has thickened, 1 to 2 minutes. Return the tofu to the pan; toss to combine with the broccoli and sauce.
4. Serve over brown basmati rice and a bit of Sriracha sauce.

Broccoli Soup

One of my pet peeves is after my son asks me for something to eat, I dutifully make it, and then he doesn’t want it. As I have no intention of making him another meal, it takes some creative maneuvering to rebrand my original dish and trick him into eating the same thing he previously rejected. 

Today he wanted some “green soup”. I quickly had broccoli soup on the table, only to hear, “No mommy, I want red soup. Not green soup.”  Although my wrath was brewing inside, I put a fake smile on my face and swiftly took the soup back to the kitchen to come up with a plan. I transferred the soup to another bowl, grated some cheddar on top, and as it melted, put a red ketchup happy face over the cheese. (Ry is obsessed with happy faces and sad faces lately).  
As I was walking over to him, I hear “No mommy, I want yellow soup.” My eye started twitching. Oh God please let him eat this. I really don’t want to order pizza right     now…  
With the bowl in front of him, he looked it over, and was satisfied at the yellow of the cheese and the red of the ketchup, and ate the whole thing! Success!  
But then he said, “Mommy, can I have more soup please? I want purple.” 

Hmmm…another day, another battle!

Easy Broccoli Soup


INGREDIENTS:

5 cups Broccoli florets (frozen OK)
1 medium potato, peeled and cubed
2 cloves garlic
1/4 – 1/2 cup whole milk
1 small onion, chopped
olive oil
salt and pepper to taste
cheddar cheese, greek yoghurt, breadsticks for garnish if desired


PREPARATION:

1. Cook broccoli and potato. Put the potato and garlic in a saucepan, add enough water to just cover the potato, and boil until cooked.  Put the broccoli in the steamer on top so they cook at the same time. Drain and set aside, reserving 1 cup of cooking water. 

2.  Finely chop onion and saute in olive oil until softened. Add back broccoli and potato with reserved water and milk. Simmer.

3. Puree in food processor or with stick blender. Add more liquids for desired consistency. Season to taste.

4. Garnish with cheddar and greek yoghurt.