Dal Tadka

It’s all relative. When it comes to things like camping, I am not very adventurous. If we aren’t staying in a 5 star hotel, I am not pleased. But when it comes to food, you might as well call me Indiana Jones. I am happy to try any cuisine, be it from Ethiopia, Yemen, Korea, Sri Lanka, or anywhere really. I have eaten  from the (probably Hepatitis infected) Pani Puri stands on Chowpatty beach in Mumbai, to Gordon Ramsay’s elegant cuisine at Verre, and even tried garlic fried mealworms in my college Entomology class.
I feel that food tastes even better when you are enjoying it with someone who shares your passion for it. So imagine my agony when I found out my true love did not share my same palate. He thought foie gras was foie-gross and unagi was u-nasty. And needless to say, he was horrified at the fried insect “snacks” from the food carts we saw in Bangkok.  
After we got married, I tried to tempt him with my savory salmon cake draped with caviar and dill, or attempted to entice him with my Moroccan pumpkin tagine. But alas, he was not impressed. No matter what I did, it did not remind him of the taste of “home.”  Then I realized I was going about it all wrong. It wasn’t about being grandiose or fancy, it was more about simplicity and comfort and familiarity. And what would bring him that gustatory satisfaction? A mere dal chawal. Dal and rice. The most humble dish.
At first I turned up my nose. Dal? That’s it?? But then I realized how perfect this simple dish was. All at once it was healthy, tasty, budget friendly, and finally with some training, easy to make. Because dal is so versatile, and there are so many varieties, nearly everyone makes it differently. So the last time I was in Lahore, my hubby’s talented sister showed me how they made it in their home. I stood by with a notebook in hand trying to jot down approximate measurements, and after a lot of practice, have made this dal so that even my picky Lahori munda asks for seconds.
It’s funny how food really connects two people. Now after ten years of knowing each other, I can easily tuck into a hearty biryani at Daily Restaurant and he can have black cod with me at Nobu.  In fact, just the other day, we went to Laduree and he ordered the Madagascar chocolate macaron. After taking a bite, he looked at me, and said, “These are good. But yours are much better.”
And he meant it. If that isn’t true love, then I don’t know what is. 
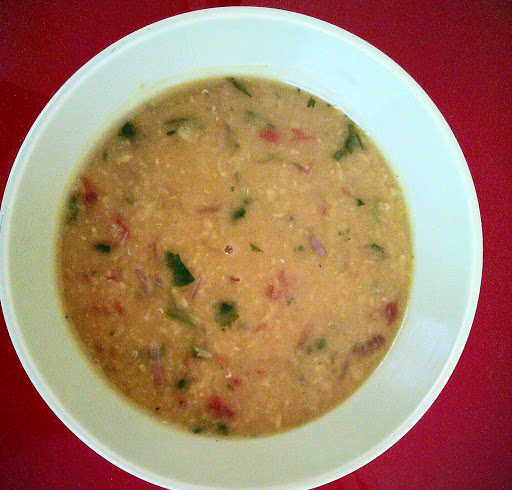

Dal Tadka


INGREDIENTS:

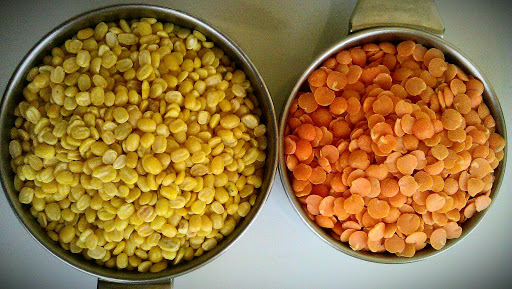
1 cup Moong dal (rinsed – on left, see picture below)
1 cup Masoor dal (rinsed – on right, see picture below)
1 tsp salt (or to taste)
1 tsp turmeric
1 tsp red chili powder (to taste)
1 tbsp grated garlic (to taste)
1 tsp grated ginger
2 small Indian red onions (finely sliced)
2 small tomatoes (chopped finely)
1-2 green chillis (optional)
1 bunch fresh coriander (chopped finely)
3 tbsp vegetable oil
water
PREPARATION:

1.  Add in large pot:  Both Dals, Garlic, turmeric, chili powder and 6 cups water. Bring to boil. Lower heat to medium to medium high and partially cover. Check water level periodically and add additional water as it cooks. Cook for approximately 25 minutes.  (Dal is cooked after tasting,  it should be very soft and liquid is not clear.)
2.  While dal cooks, chop vegetables. In separate hot skillet add 3 tbsp  oil. Add onion and cook until golden brown. Add ginger, then tomato, then green chilis (if using). Add coriander and fry until becomes a paste. You may have to add a little water so it doesn’t stick to pan. When all a paste, add into hot (already cooked )dal and mix.
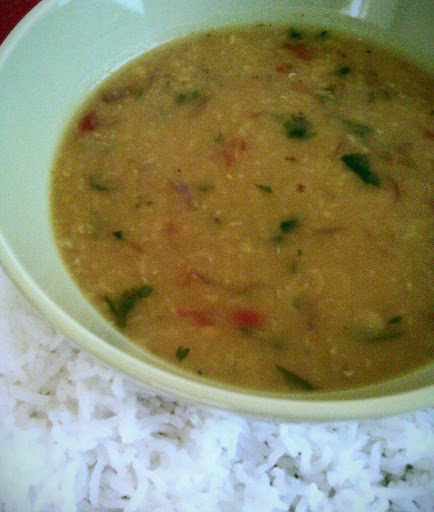
Serve with steamed basmati rice. Garnish with lemon if desired. Generously serves 4 people.

NOTES:
If you let this sit around for a bit before serving it, it tastes even better as the flavors come together. Dal tastes really good the next day, and is suitable for freezing.
I also serve this to my babies. It is a bit spicy, so I usually add in a couple scoops of yogurt  to the dal and rice and blend it all together. You can also make a separate batch with no chili powder if your kids are very sensitive.
This version is done on a stovetop instead of a pressure cooker since both my husband and I are afraid of pressure cookers exploding. Even with this stovetop method, from start to finish the whole process takes me about 45 minutes max.

Spinach and Parmesan Cakes

It was around 11am today when Ry gave me the look.  The “mommy I’m hungry” look. So I proactively inquired before the “mommy I’m hungry tantrum” started.


Me: What would you like to eat?

Ry: Green.

Me: You mean like green beans? (Knowing full well he would NEVER ask for those).

Ry: No, like the color.

Ok. So he wants to eat the color green. Not too bad a request. As much as I just wanted to boil some peas and put them  in a green bowl and give him a green fork to eat them with, I decided instead to be a bit more creative. I mean, it’s not like he asked for Chartreuse or Magenta or something. Green had so many options.

I decided to go with something spinachy since it is green, healthy, and most importantly, I already had it at home.  I finally decided on spinach and parmesan cakes. I had found a version of these on Eating Well but mine are much more flavorful and spicier. The best thing about these is that they are great finger foods for kids and easy to pop in a container for a quick snack or light meal on the go.  After I made these, I did end up putting them on a green plate with a green fork and my little man was very happy.
Spinach and Parmesan Cakes


(Using a 12pc muffin tin, Makes 8 cakes if you fill up to the top, or 12 if you fill up half way)
INGREDIENTS:

·         10 – 12 ounces frozen spinach (I used about 11 cubes of the Waitrose frozen spinach), Thawed and drained
·         1/2 cup cottage cheese (low fat ok if you prefer)
·         3/4 cup shredded Parmesan cheese, plus more for garnish
·         2 large eggs, beaten
·         2 clove garlic, minced (if you don’t love garlic as much as me, 1 large clove is ok)
·         2 tbsp minced red onion
·         Red chilli pepper flakes
·         ½ tsp cumin
·         1/4 teaspoon salt
·         1/4 teaspoon freshly ground pepper
PREPARATION:
1.     Preheat oven to 400°F.
2.     In a medium bowl, mix thawed and drained spinach, cottage cheese, Parmesan, eggs, garlic, onion, and all spices. Stir to combine.
3.     Coat the cups of the muffin pan with cooking spray. Divide the spinach mixture among the 8 cups (they will be very full, or 12 cups half way full. (I usually do 12 since I use the smaller portions for feeding the kids).
4.     Bake the spinach cakes until set, about 20 minutes. Let stand in the pan for 5 minutes. Loosen the edges with a knife and remove from pan. Serve warm, sprinkled with more Parmesan, if desired.

Breakfast Burrito and Salsa

My baby has the most delicious thighs. Little pudgy rolls of yummy goodness. As I pulled him out of his highchair after breakfast today, a piece of strawberry and a couple of cheerios fell out from between his thigh rolls! At first I was amused. But then I silently prayed,  Oh God please don’t let me ever get that fat so that could happen to me.

Truth be told, I did look at the positive side in case I did get in that condition. For example, suppose I had to work through lunch. Instead of starving, I could just lift up my skirt, give my leg a little shake,  and out would pop a pizza and a few fries. Pretty convenient, yes?  But no, the social and health problems would definitely outweigh (haha) any advantages.

So, out of fear of raising the next generation of thunder thighs, I am always challenging myself to find healthy but tasty meals to feed my family.  Breakfast in particular has always been a hard meal for me to cook since I was never much of a breakfast person myself. I never knew what to make. Then one morning, I came up with this breakfast burrito with tomato salsa recipe that is extremely satisfying and my go-to recipe for when I’m stumped on what to cook. It is also versatile, you could eat it for any meal of the day, and it can even be made with store bought salsa if you are in a time crunch. 


Easy Breakfast Burritos with Fresh Tomato Salsa  (Makes 2 Burritos)


INGREDIENTS for Burritos:

2 soft corn or flour tortillas
¾ cup grated cheddar cheese
Prepared tomato salsa (recipe to follow)
2 large eggs, lightly beaten
Fresh black pepper and salt to taste
Avocado, Sour Cream, Spring Onions for garnish

PREPARATION:

Heat a skillet on high, then coat skillet with cooking spray. Add the eggs, 2-3 tablespoons of salsa, and ¼ cup cheese. Add some fresh black pepper. Scramble all together until eggs scrambled and most of water is evaporated.  About 2 minutes. Keep aside and keep warm.

Heat a clean skillet on high heat, then coat skillet with cooking spray.  Lower heat to medium and add tortilla and flip a couple times,  about 3 seconds per side until tortilla is hot.  Put ¼ cup cheese in a line down middle of tortilla and heat until cheese is melted.  Transfer tortilla to plate.  Immediately add half the egg mixture on top of the melted cheese and fold over both sides of the tortilla so it looks like a burrito. Top with salsa, sour cream, spring onions and avocado slices, or garnish as desired. Repeat whole process using rest of egg mixture and other tortilla.


Fresh Tomato Salsa  (Makes approximately  1 ½ cups prepared salsa)


INGREDIENTS:
3-4 medium tomatoes
1 small piece white onion  (approximately one square inch)
1 small cilantro bunch (stems removed, about ½ cup)
Few sprinkles Garlic powder
2 – 3 slices pickled jalepeno (more or less depending on how spicy you want it)
¼ tsp salt (or to taste)

PREPARATION:   Halve tomatoes and put in food processor (NOT blender)  with the rest of  ingredients. Pulse until desired consistency.  Adjust seasonings to taste.  

      Banana Muffins

      Oh, do you know the muffin man,
      The muffin man, the muffin man,
      Oh, do you know the muffin man,
      That lives on Drury Lane?


      My kids love that song. And I must admit it is rather catchy. Luckily it was stuck in my head as I was wondering what to do with my toddler this afternoon. 


      Muffins! We will bake muffins! After trolling online through seemingly endless muffin recipes I finally found one that satisfied my holy trinity of baking recipes:  healthy, easy, and delicious! It seemed too good to be true. But these banana muffins from Cat Can Cook looked amazing! So, measuring cups in hand, we hoped to make our muffin magic.


      With over 1000 positive comments on her site for this recipe, Cat was right. Not only were these moist and delicious but  they were so easy that my 3 year old practically made them by himself. What a fun and yummy afternoon of mommy-son bonding. 


      Banana Muffins (makes 12 muffins) from Cat Can Cook


      3 or 4 Large bananas, mashed (the more bananas the moister, so I use 4)
      1/2 cup white sugar (original recipe calls for 1 cup, but I don’t like them too sweet)
      1 slightly beaten egg
      1/3 cup melted margarine or butter
      1 teaspoon baking soda
      1 teaspoon baking powder
      1/2 teaspoon salt
      1 1/2 cups flour
      Mix the mashed banana, sugar, egg and margarine together. Set aside. In a separate bowl, mix together baking soda, baking powder, salt and flour. Mix wet and dry ingredients all together. Pour into greased muffin tins, and bake in 350 degrees F oven for approximately 12-18 minutes. Enjoy!